Via my review from http://www.cnx-software.com/2017/05/26/raiscube-prusa-i3-3d-printer-review-part-1-assembly-and-first-prints/
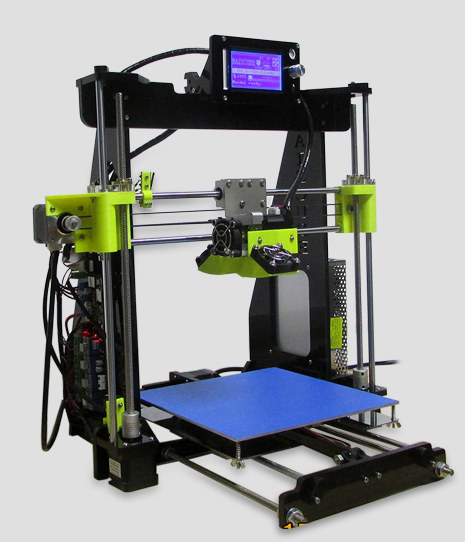
Karl here. Today we are going to start looking a Raiscube Prusa I3 3D printer kit sent for review by GearBest. It’s very similar to most low cost 3D printer kits with one exception. The parts cooler is not like any similar kits that I have seen. In my short time researching these kits the parts cooler is one of the first upgrades I see people do. Typically the parts coolers are inadequate or nonexistent. We will find out that it is actually too good. In this review we are first going to outline the basic components and a mini build guide. Then we will look and see how it prints. Prusa I3 Desktop LCD 3D Printer Specs
Main Features:
Specification:
When putting a kit printer together it is really good to understand the basics on how they operate and the basic components. At the most fundamental level, plastic is heated up to a point where it is molten. Layer by layer, from the bottom up, the printer lays down the plastic to form the object. There are 3 directions X (left and right), Y (forward and back) and Z (up and down).
The basic motion pieces are:
On this style printer the hot end and nozzle ride on 2 rods in the X direction. It is moved right and left by a belt that runs between a stepper motor with gears on the shaft and a bearing on the opposite side. On the top X rod is an end stop. End stops are used so the printer knows where in a 3 dimensional space the end of the nozzle is. When a printer is first turned on, it doesn’t know exactly where the nozzle is. The home process that is ran before every print, gives the printer a point of reference for all axis. The Y axis is very similar to the X axis. Instead of the hot end the build plate moves from the front to the back. Again the stepper motor in the back moves the plate forward and back with a belt, gears, and a bearing. Finally the Z axis is controlled by 2 stepper motors that work together to move the hot end up and down. It is guided by 2 rods but instead of a belt a threaded rod turns to move the hot end up and down.
At this point we can move our 3 directions X,Y, and Z. X and Y move with belts. Z moves with a threaded rod. Precision is the name of the game with 3D printers. Everything needs to be tight and not sloppy. Before Starting to Print
Before you even turn the machine on be sure to move all your axis, and make sure nothing binds or rubs and everything is tight.
During this process I found that my rods that the X axis slid on seemed too short. I contacted GearBest and they were correct. During assembly I initially put the wrong length rods in and tried to force so I might have damaged something. I ended up having to make some spacers about 22mm long to make up the difference. This was completely my fault. I didn’t pay attention enough to the rod lengths in the instructions. I initially cut some bolts but eventually just printed some slightly longer and trimmed them to take up the slack. My trim job on red slugs wasn’t perfect so I wedged a drywall screw a couple treads and has worked well since. As an afterthought I might have been able to do without the red filler pieces and used screws from the beginning.
After turning on navigate the menus and preheat for PLA, load the filament, and home the nozzle. Use the menus, and move the nozzle all around on all axis and extrude some filament. I had to adjust the potentiometer on the stepper motor drivers on both the Z and extruder up. The stepper motors weren’t getting enough juice, and they were clicking and not moving. If you hear clicking that is likely the cause or maybe a binding issue.
Now we need to level the bed. I never printed directly on the bed. I cut a piece of glass that I had that was leftover from CR-10 review. The glass came in a 6 pack of 12” squares for about $10. I had such good luck I went directly to it. Glass is nearly perfectly flat. If it wasn’t you would see these variances in the reflection. I have a tile cutter from where I tiled my bathrooms and used it to cut the mirror down to size. Home the printer again then disable the stepper motors. In the CR-10 review I found leveling by eye was the best but because of the huge cooling fans I wasn’t able to get the right angle. I took a different approach this time. I moved to each corner and just barely tapped the build plate up until I couldn’t hear the glass tapping the nozzle.Then I backed it up just to hear it tapping again. I went around the 4 corners 4 or 5 times to get it adjusted. Building Prusa i3
I had about 10-11 hours with building, troubleshooting, and managing the wires. I read people doing these kits in about 8 hours but I don’t see how unless they didn’t manage wires. I recommend velcro and not zipties. I think it looks much neater and you can adjust without fear of cutting tiny wires. I downloaded instructions from GearBest page. I found them adequate but not great. All the necessary tools were included with the exception of a pliers or wrench to tighten the big bolts. It came with some cool looking green pla. Below are some of the more notable components. There is no settings with this kit nor software. It does come with an 8 GB SD card but it is blank. I did end up with spare nuts and bolts which is nice.
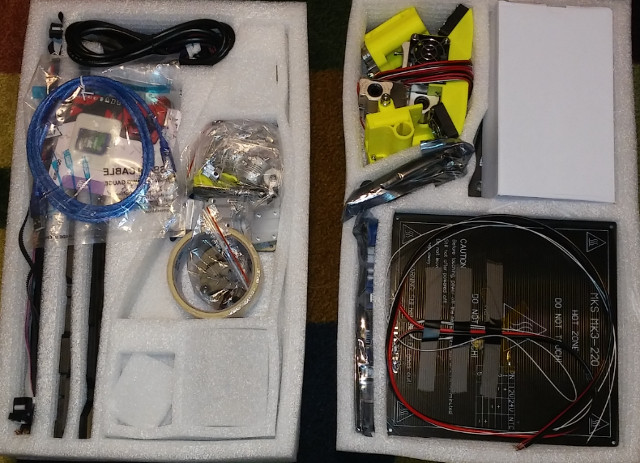
Kit in package – Click to Enlarge

RepRap Melzi v2.0 Board – Click to Enlarge
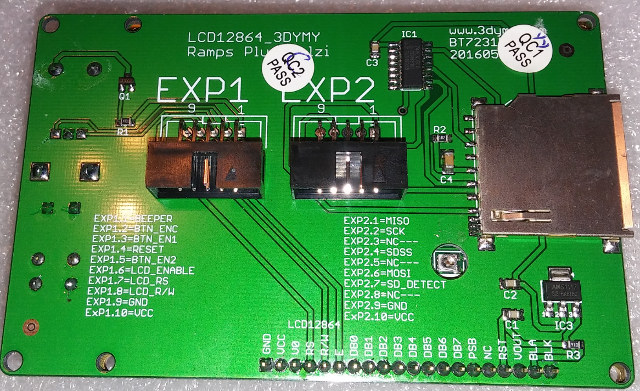
LCD Board – Click to Enlarge
Some Cable Management – Click to Enlarge
I made just a couple changes to the stock build. I already mentioned that I installed a mirror for the build plate. I also added a fan to keep the board cool. The stepper motor drivers seemed really hot so I added the fan to keep them cool. When I first found out about reviewing this printer I thought ohh boy I was going to have to do a lot of mods. Adding a MOSFET, bracing etc… to make it print well. I am glad I didn’t buy the MOSFET ahead of time because I don’t think it is needed. A MOSFET is used to to take the burden of supplying power to heat the bed from the board and pull it directly from the power supply. There have been cases of really cheap boards/connectors causing fires.
The instructions show setting up the Z axis stepper motors in some series way but I couldn’t get it to work. I did some research and found out you can also run them parallel and I connected them this way.
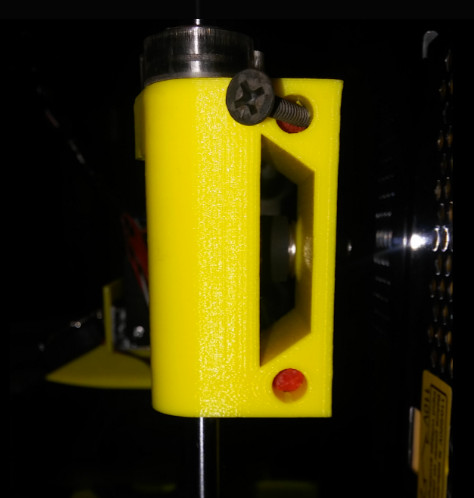
I got 1 jam so I took a picture while the fan was off. I tried to print the cat that came with the CR-10, and it has big retractions in it. I believe it pulled back too far too many times and pulled molten filament and it got in the gears. Very simple design.
 Final build pictures below.
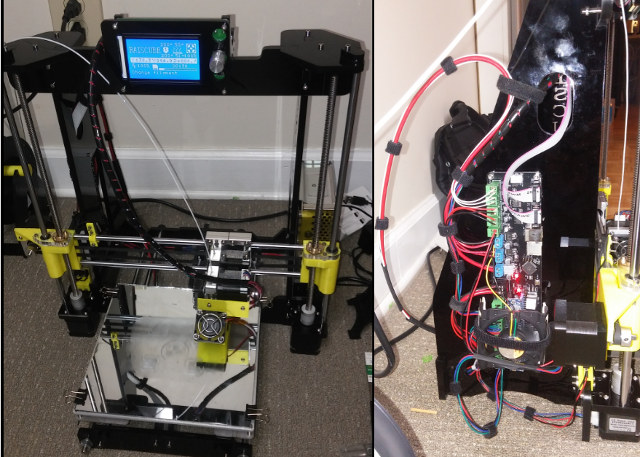
Click to Enlarge First Print
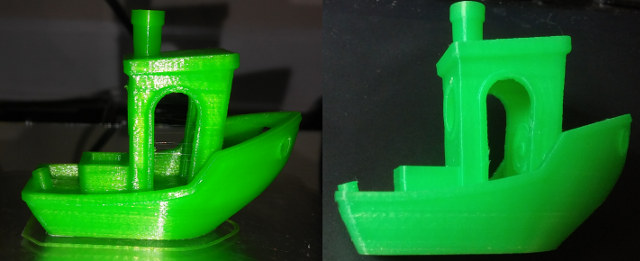
The printer did not come with any pre-sliced files with it. So I opted for a print I have printed several times and knew. I just guessed on temperature and it turned out good. I hate to take these pictures with flash but I didn’t have choice with the lighting while it was on the bed. The picture without the flash is more indicative of what this filament looks like in person. The benchy looks like it missed a layer on the hull but it feels smooth.
Click to Enlarge
With this translucent filament I found I needed more top and bottom layers and my initial print was too hot and caused stringing.(Nope too cool)
 Craftware, Octoprint, and dialing in settings
I use Craftware to slice my objects for printing. I started out with the settings that I dialed previously for CR-10 review. Which was basically stock settings with some slight tweaks. After printing and testing, I found that the fan needs to be set to 75% or less or it cools too well, and causes some curling in extreme overhangs. One reviewer of the printer on GearBest thankfully mentioned this or I might not have tried this. While troubleshooting, I could not override the fan settings with the menu during testing. I would set the fan slower, then a short while later it was back at the percentage I set in the slicer. I looked at the gcode and at every layer change I see an M106. M106 is the gcode to change fan speed. Gcode is the language for 3D printers, CNC machines, and laser engravers are programmed with. In the future I will remove all of these, when wanting to test on the fly. I tested with Cura, and it is set only once at the beginning so it should not be an issue. Another odd thing is that I found that the green filament strings more at lower temperatures.
Octoprint worked as expected at 250,000 baud rate. Octoprint allows you to start stop prints through a web page, do time lapse videos, etc…
If you would like more info on Octoprint or Craftware, check the second part of CR-10 review. Here are the presets that I used for the green PLA that came with the printer for Craftware.
All of the prints below are printed at suboptimal temperature and fan speed and still turned out well. The lattice cube was the only one with fan and temperature calibrated.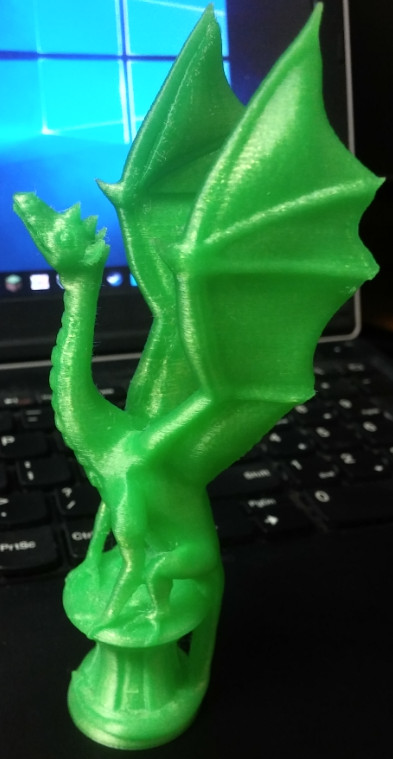
Click to Enlarge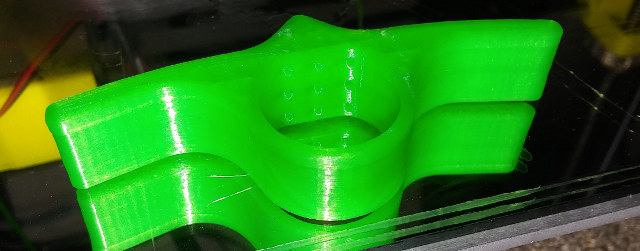
Click to Enlarge
Click to Enlarge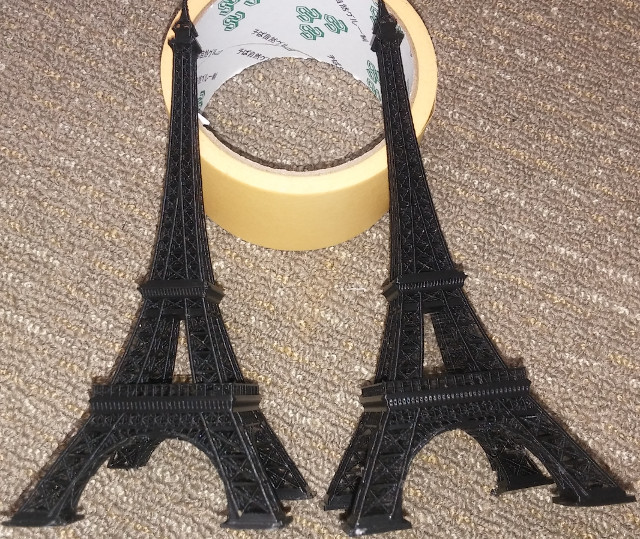
Click to Enlarge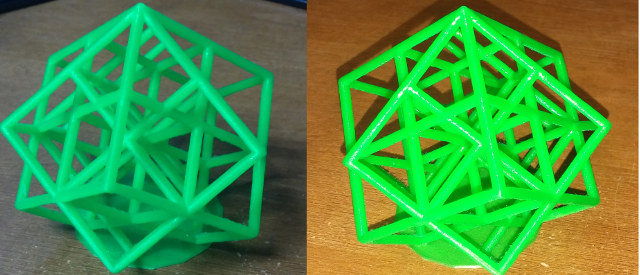
Click to Enlarge Final Thoughts
Good
Not so good
I like this printer and had good success with it. There are just a few minor gripes. I was apprehensive over the acrylic but it serves its purpose to keep costs down. I’m relatively new to 3D printing but I believe this is a good kit. The parts cooling fan is fantastic. I am currently printing a baby groot in kcamel wood PLA that I purchased from GearBest. I will include more prints in 2nd part. In the second part we will also look to see if adding an E3D clone improves quality.
I would like to thank Gearbest for the Prusa I3 clone for review, and if interested, you can purchase it fworldwide shipping using CNXPrusa coupon.
Further Discussion: Click Here > Freaktab
http://freaktab.com/forum/main-category/new-product-reviews/freaktab-user-reviews/650273-raiscube-prusa-i3-3d-printer-review-%C2%96-part-1-assembly-first-prints-and-configuration
Karl here. Today we are going to start looking a Raiscube Prusa I3 3D printer kit sent for review by GearBest. It’s very similar to most low cost 3D printer kits with one exception. The parts cooler is not like any similar kits that I have seen. In my short time researching these kits the parts cooler is one of the first upgrades I see people do. Typically the parts coolers are inadequate or nonexistent. We will find out that it is actually too good. In this review we are first going to outline the basic components and a mini build guide. Then we will look and see how it prints. Prusa I3 Desktop LCD 3D Printer Specs
Main Features:
- Mainboard: Melzi V2.0
- 210 x 210 x 210mm build volume
- 12864 LCD screen shows your printing information directly and easy for you to manipulate
- 8mm-thick laser cut acrylic frame for rigidity and long life
- 3 cooling fans, strong air flow to enhance cooling performance
- Hot bed temperature up to 120 Deg.C, great for ABS material
- Click here to know the installation details
Specification:
- Main board: Melzi V2.0
- Build volume: 210 x 210 x 210mm
- Filament diameter: 1.75mm
- Z axis precision: 0.004mm, XY axis precision: 0.012mm
- Printing precision: 0.1 – 0.2mm
- Layer thickness: 0.1 – 0.4mm
- Nozzle diameter: 0.4mm
- Extruder temperature: 260 Deg.C ( max. )
- Hot bed temperature: 120 Deg.C ( max. )
- Printing format: STL, OBJ, G-code
- Support system: Windows XP, Win7, Win 8, Linux, Mac
- Support language: English, Chinese
- The color of the 0.5kg PLA material we send is sent at random
When putting a kit printer together it is really good to understand the basics on how they operate and the basic components. At the most fundamental level, plastic is heated up to a point where it is molten. Layer by layer, from the bottom up, the printer lays down the plastic to form the object. There are 3 directions X (left and right), Y (forward and back) and Z (up and down).
The basic motion pieces are:
- Stepper motors
- End stops
- Rods
- Belts
- Bearings
- Frame
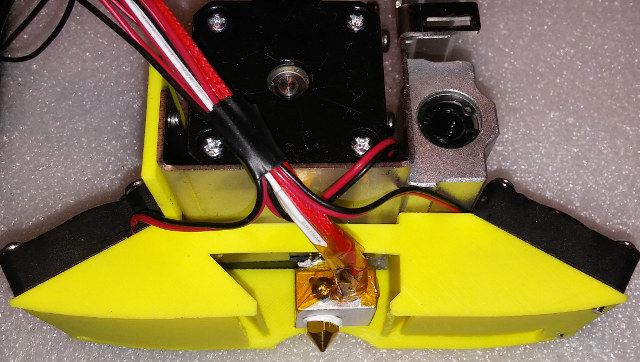
- Hot end (This is melting chamber, cooling fans, etc)
- Build plate
On this style printer the hot end and nozzle ride on 2 rods in the X direction. It is moved right and left by a belt that runs between a stepper motor with gears on the shaft and a bearing on the opposite side. On the top X rod is an end stop. End stops are used so the printer knows where in a 3 dimensional space the end of the nozzle is. When a printer is first turned on, it doesn’t know exactly where the nozzle is. The home process that is ran before every print, gives the printer a point of reference for all axis. The Y axis is very similar to the X axis. Instead of the hot end the build plate moves from the front to the back. Again the stepper motor in the back moves the plate forward and back with a belt, gears, and a bearing. Finally the Z axis is controlled by 2 stepper motors that work together to move the hot end up and down. It is guided by 2 rods but instead of a belt a threaded rod turns to move the hot end up and down.
At this point we can move our 3 directions X,Y, and Z. X and Y move with belts. Z moves with a threaded rod. Precision is the name of the game with 3D printers. Everything needs to be tight and not sloppy. Before Starting to Print
Before you even turn the machine on be sure to move all your axis, and make sure nothing binds or rubs and everything is tight.
- The belts must be tight in order to not slip during fast moves. Make sure it isn’t rubbing anything so check alignment visually.
- Special consideration has to be made for the Z axis because 2 stepper motors have to work together. The X axis has to be parallel with the build plate. I have read using a ruler but I just used my glue stick to get set. I place the gluestick between stepper motor and Z rod bracket and set height on both sides.
- Place the 3 end stops close to the correct positions. Move your axis by hand and make sure the x is at the left edge of the build plate. The Y axis puts the hot end at the front of the build plate. And the Z axis is just above slightly above the build plate.
- Check to make sure none of the wires get in a bind especially the build plate and X stepper motor.
During this process I found that my rods that the X axis slid on seemed too short. I contacted GearBest and they were correct. During assembly I initially put the wrong length rods in and tried to force so I might have damaged something. I ended up having to make some spacers about 22mm long to make up the difference. This was completely my fault. I didn’t pay attention enough to the rod lengths in the instructions. I initially cut some bolts but eventually just printed some slightly longer and trimmed them to take up the slack. My trim job on red slugs wasn’t perfect so I wedged a drywall screw a couple treads and has worked well since. As an afterthought I might have been able to do without the red filler pieces and used screws from the beginning.
After turning on navigate the menus and preheat for PLA, load the filament, and home the nozzle. Use the menus, and move the nozzle all around on all axis and extrude some filament. I had to adjust the potentiometer on the stepper motor drivers on both the Z and extruder up. The stepper motors weren’t getting enough juice, and they were clicking and not moving. If you hear clicking that is likely the cause or maybe a binding issue.
Now we need to level the bed. I never printed directly on the bed. I cut a piece of glass that I had that was leftover from CR-10 review. The glass came in a 6 pack of 12” squares for about $10. I had such good luck I went directly to it. Glass is nearly perfectly flat. If it wasn’t you would see these variances in the reflection. I have a tile cutter from where I tiled my bathrooms and used it to cut the mirror down to size. Home the printer again then disable the stepper motors. In the CR-10 review I found leveling by eye was the best but because of the huge cooling fans I wasn’t able to get the right angle. I took a different approach this time. I moved to each corner and just barely tapped the build plate up until I couldn’t hear the glass tapping the nozzle.Then I backed it up just to hear it tapping again. I went around the 4 corners 4 or 5 times to get it adjusted. Building Prusa i3
I had about 10-11 hours with building, troubleshooting, and managing the wires. I read people doing these kits in about 8 hours but I don’t see how unless they didn’t manage wires. I recommend velcro and not zipties. I think it looks much neater and you can adjust without fear of cutting tiny wires. I downloaded instructions from GearBest page. I found them adequate but not great. All the necessary tools were included with the exception of a pliers or wrench to tighten the big bolts. It came with some cool looking green pla. Below are some of the more notable components. There is no settings with this kit nor software. It does come with an 8 GB SD card but it is blank. I did end up with spare nuts and bolts which is nice.
Kit in package – Click to Enlarge
RepRap Melzi v2.0 Board – Click to Enlarge
LCD Board – Click to Enlarge
Some Cable Management – Click to Enlarge
I made just a couple changes to the stock build. I already mentioned that I installed a mirror for the build plate. I also added a fan to keep the board cool. The stepper motor drivers seemed really hot so I added the fan to keep them cool. When I first found out about reviewing this printer I thought ohh boy I was going to have to do a lot of mods. Adding a MOSFET, bracing etc… to make it print well. I am glad I didn’t buy the MOSFET ahead of time because I don’t think it is needed. A MOSFET is used to to take the burden of supplying power to heat the bed from the board and pull it directly from the power supply. There have been cases of really cheap boards/connectors causing fires.
The instructions show setting up the Z axis stepper motors in some series way but I couldn’t get it to work. I did some research and found out you can also run them parallel and I connected them this way.
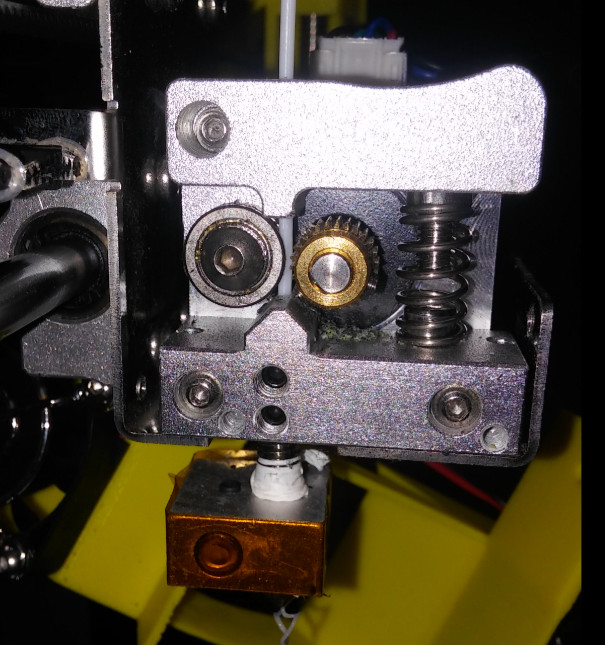
I got 1 jam so I took a picture while the fan was off. I tried to print the cat that came with the CR-10, and it has big retractions in it. I believe it pulled back too far too many times and pulled molten filament and it got in the gears. Very simple design.
Final build pictures below.Click to Enlarge First Print
The printer did not come with any pre-sliced files with it. So I opted for a print I have printed several times and knew. I just guessed on temperature and it turned out good. I hate to take these pictures with flash but I didn’t have choice with the lighting while it was on the bed. The picture without the flash is more indicative of what this filament looks like in person. The benchy looks like it missed a layer on the hull but it feels smooth.
Click to Enlarge
With this translucent filament I found I needed more top and bottom layers and my initial print was too hot and caused stringing.(Nope too cool)
Craftware, Octoprint, and dialing in settingsI use Craftware to slice my objects for printing. I started out with the settings that I dialed previously for CR-10 review. Which was basically stock settings with some slight tweaks. After printing and testing, I found that the fan needs to be set to 75% or less or it cools too well, and causes some curling in extreme overhangs. One reviewer of the printer on GearBest thankfully mentioned this or I might not have tried this. While troubleshooting, I could not override the fan settings with the menu during testing. I would set the fan slower, then a short while later it was back at the percentage I set in the slicer. I looked at the gcode and at every layer change I see an M106. M106 is the gcode to change fan speed. Gcode is the language for 3D printers, CNC machines, and laser engravers are programmed with. In the future I will remove all of these, when wanting to test on the fly. I tested with Cura, and it is set only once at the beginning so it should not be an issue. Another odd thing is that I found that the green filament strings more at lower temperatures.
Octoprint worked as expected at 250,000 baud rate. Octoprint allows you to start stop prints through a web page, do time lapse videos, etc…
If you would like more info on Octoprint or Craftware, check the second part of CR-10 review. Here are the presets that I used for the green PLA that came with the printer for Craftware.
All of the prints below are printed at suboptimal temperature and fan speed and still turned out well. The lattice cube was the only one with fan and temperature calibrated.
- Aria the dragon – https://www.thingiverse.com/thing:600550
Click to Enlarge
- Daughter asked for a page holder she found on thingiverse – https://www.thingiverse.com/thing:650623
Click to Enlarge
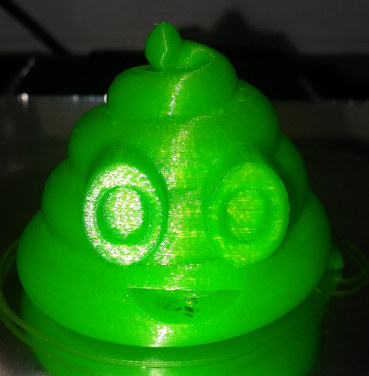
- Poop emoji for daughters friend…go figure. Should have put support on inside on mouth. 0% infill – https://www.thingiverse.com/thing:1023195
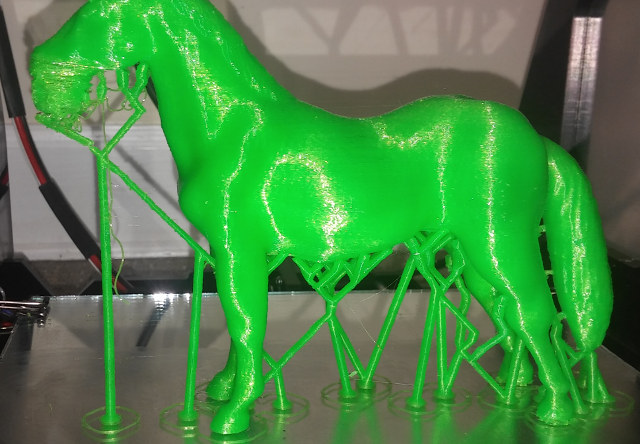
- Unicorn first failed print. I added some additional custom supports to the head in Craftware and it printed fine. Didn’t get a picture of final before daughter gave to friend. I was very surprised all these little supports made it but one. https://www.thingiverse.com/thing:182335
Click to Enlarge
- CR-10 left vs Prusa I3 right. I broke part off CR-10. More stringing but I think with retraction and temp calibration I can dial in. The CR-10 is just slightly better. This was printer before I figured out to turn the fan down – https://www.thingiverse.com/thing:127683
Click to Enlarge
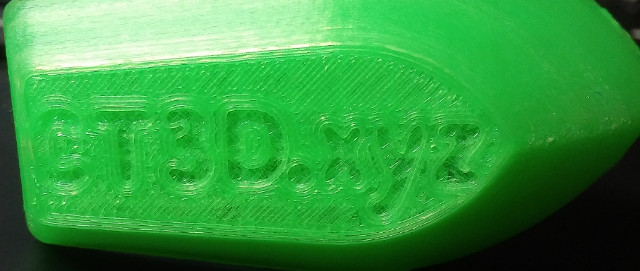
- Lattice Cube Torture Test with and without flash. Finally got stringing to stop 2nd half testing temperatures – https://www.thingiverse.com/thing:1856832
Click to Enlarge Final Thoughts
Good
- The bed and the nozzle heat up fast
- Relatively quiet
- Prints accurately
- No modifications needed to print well. Only one recommendation is a mirror print plate.
- All the bearings and parts are tight and not sloppy.
- Wiring is properly sized for the loads.
Not so good
- Needs better instructions. Might not be easiest to put together for a beginner.
- Better springs for build plate and thicker build plate H bracket. (I have to re-level every print. I think this would help)
- Beeper/buzzer is too loud so I removed it.
- Add fan to keep Arduino board cool.
I like this printer and had good success with it. There are just a few minor gripes. I was apprehensive over the acrylic but it serves its purpose to keep costs down. I’m relatively new to 3D printing but I believe this is a good kit. The parts cooling fan is fantastic. I am currently printing a baby groot in kcamel wood PLA that I purchased from GearBest. I will include more prints in 2nd part. In the second part we will also look to see if adding an E3D clone improves quality.
I would like to thank Gearbest for the Prusa I3 clone for review, and if interested, you can purchase it fworldwide shipping using CNXPrusa coupon.
Further Discussion: Click Here > Freaktab
http://freaktab.com/forum/main-category/new-product-reviews/freaktab-user-reviews/650273-raiscube-prusa-i3-3d-printer-review-%C2%96-part-1-assembly-first-prints-and-configuration