Announcement

Collapse
No announcement yet.

Announcement

Collapse
No announcement yet.

CX-01 Information by Tatubias

Collapse
X
 
  • Filter
  • Time
  • Show
Clear All
new posts

    CX-01 Information by Tatubias

    Thank you cnxsoft for this complete tutorial:

    Pandawill finally managed to release CX-01 firmware (234 MB) about a week ago. This firmware can be used for devices with 4 or 8 GB flash memory (2 separate directories). You only need to update the firmware if your device has some serious problems, or if CX-01 gets a proper firmware update (we can always dream…).

    ROM Download:
    http://www.pandawillforum.com/soft/R...TV%20CX-01.rar

    Once you’ve downloaded ROM for android TV CX-01.rar in a Windows PC, extract it and enter ROM for android TV CX-01 directory. You’ll find 1 file and 1 directory:

    V1.0-4096-8189_en – Directory for 4GB firmware
    V1.0-8192-8189_en – Directory for 8GB firmware
    FWDN_8923.zip – Telechips tools to burn the firmware to flash

    Extract FWDN_8923.zip, go to vtcdrv directory and install the driver corresponding to your operating system.

    Now click on FWDN_V7_v2.22.exe, click on …, and select one of the 3 files in V1.0-4096-8189_en then click on add file. Repeat until you’ve added the 3 files for the 4GB firmware:

    CX1-V1.0-4096-8189_en.rom – MTD
    lk.rom – BOOT
    NAND Data.fai – NAND Data

    Now connect the mini USB to USB cable to your computer (but not to the CX-01 just yet), press the Fn key and insert the mini USB cable into the CX-01, until it is detected by Windows and complete the driver installation. Once this is done, the Area Map section you show the NAND Data and MTD partitions. Click on the Start button to start flashing the new firmware to the device.


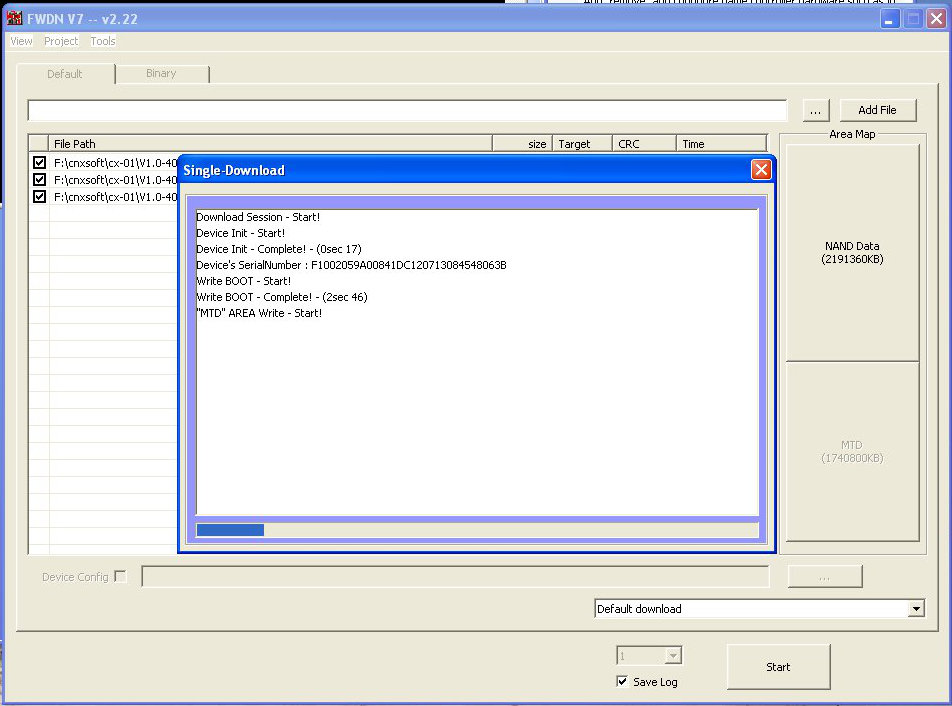
    FWDN V7 During CX-01 Firmware Flashing

    Once you see “Download is complete! (1st)” the update is complete. This is the log for the update:
    ============================================
    FWDN V7 -- v2.22
    ============================================

    [DEBUG] CFwdnPort::Check_VtcUsbPortChange: \\?\usb#vid_140e&pid_b086#5&24f64713&0&1#{db6585b8-0409-4ee6-9636-e595901c59ca} is pluged.
    [DEBUG] CFwdnDownload:eviceArrivalEvent: Device Arrival Event (dev=0)
    Download Session – Start!
    Device Init – Start!
    Device Init – Complete! – (0sec 17)
    Device’s SerialNumber : F1002059A00841DC120713084548063B
    [DEBUG] CFwdnDownload::OnDownloadDefault: check=1 filepath=F:\cnxsoft\cx-01\V1.0-4096-8189_en\lk.rom filesize=333KB type=0
    [DEBUG] CFwdnDownload::OnDownloadDefault: check=1 filepath=F:\cnxsoft\cx-01\V1.0-4096-8189_en\CX1-V1.0-4096-8189_en.rom filesize=233MB type=4
    [DEBUG] CFwdnDownload::Verify_ImageFile: [HEADER] : Size=48 CRC=0x3388635F
    [DEBUG] CFwdnDownload::OnDownloadDefault: check=1 filepath=F:\cnxsoft\cx-01\V1.0-4096-8189_en\NAND Data.fai filesize=1104KB type=5
    [DEBUG] CFwdnDownload::Verify_ImageFile: [HEADER] : Size=96 CRC=0xD22A5DC4
    [DEBUG] CFwdnDownload::Verify_ImageFile: Image Version : TCC FAT IMG V0.1
    [DEBUG] CFwdnDownload::Verify_ImageFile: DISKSIZE = 0x85C00000
    Write BOOT – Start!
    Write BOOT – Complete! – (2sec 46)
    “MTD” AREA Write – Start!
    “MTD” AREA Write – Complete! – (4min 33sec 29)
    “NAND Data” AREA Write – Start!
    “NAND Data” AREA Write – Complete! – (2sec 26)
    Check CRC (F:\cnxsoft\cx-01\V1.0-4096-8189_en\CX1-V1.0-4096-8189_en.rom) – Start!
    Check CRC – Complete! – (52sec 73)
    Check CRC (F:\cnxsoft\cx-01\V1.0-4096-8189_en\NAND Data.fai) – Start!
    Check CRC – Complete! – (0sec 12)
    Download Session – Ending…
    Download Session – End!
    #################### Download is complete! (1st) ####################

    This method should also work for other Telechips device by simply using the corresponding firmware files and most likely a slightly different way to enter flash mode.


    Source:http://www.cnx-software.com/2012/08/...cx-01-mini-pc/

    Btw: i have bricked my device and make it alive again with this tutorial

    #2
    How To - Root CX-01

    Here are the instructions to root it:


    note: a user hss reported that unlock root bring a malwared installed so be aware of this method. below is an other methot to do the rooting


    Download Unlock Root http://www.unlockroot.com/. NB: The download link does not appear to work right now, but the filename is unlockroot23.exe, so here are some alternative untested download links.
    Find Unlockroot\driver\android_winusb.inf in the directory where you install Unlockroot
    Open the file in a text editor, and add the following lines:
    For Win 7 (64-bit):
    [Google.NTamd64] 64-bit]
    ;TCC8920
    %SingleAdbInterface% = USB_Install, USB\Vid_18D1&Pid_DEED&MI_01
    %CompositeAdbInterface% = USB_Install, USB\Vid_18D1&Pid_DEED&Rev_0231&MI_01
    For WinXP (32-bit):
    [Google.NTx86]
    ;TCC8920
    %SingleAdbInterface% = USB_Install, USB\Vid_18D1&Pid_DEED&MI_01
    %CompositeAdbInterface% = USB_Install, USB\Vid_18D1&Pid_DEED&Rev_0231&MI_01
    Connect CX-01 to your PC via USB, it should then detect your new device. If it doesn’t simply press “fn” key on CX-01 TV Stick.
    Select the driver that you edited in Unlockroot\driver\android_winusb.inf
    Once the driver is installed, run unlockroot
    Press ROOT, then reroot device.
    Reboot CX-01 mini PC
    Done!


    Read more: http://www.cnx-software.com/category...#ixzz24E6Gia2j

    Comment


      #3
      How To - CX-01 Custom rom.

      We are happy to announce the launch of the FIRST (public released) custom rom for the CX-01 Android TV stick.
      I would like to thank Pandawill for supplying the device, tatubias for the tweaks and testing my/our roms & FUN for the apps to build the rom.

      The rom comes in 1 flavor.
      Phat which is the "normal" rom supplied but with the tweaks applied, rooted, with Holo Launcher as the home screen/launcher & with hackers keyboard installed, a few apps have been removed like the manual and the old market. (& busybox 1.22 has been installed)
      This includes the following extra apps installed (in user space so they can be removed if you want)


      • AdFree
      • Adobe Flash Player 11.1.115.17
      • Amazon Apps
      • Cifsmanager
      • Fing
      • Mediahouse
      • Mizuu lite
      • Moboplayer
      • MortPlayer
      • Opera Mobile Web Browser 12.0.4
      • Solid Explorer
      • QuickPic
      • SD Maid
      • Stericson Busybox Installer
      • Terminal Client
      • Wifiadb
      • YouTube HD


      1 - Stable Android Market.
      2 - build.prop Tweaks.
      • Full Market.
      • Improve touch responsiveness through Hardware Rendering.
      • GPU try to handle User interface.
      • Some other video performances added.
      • Max events UI can handle in 1s set to 240.
      • Increase "touch" responsiveness.
      • Dalvik Tweak updated Values 15 August.
      • Screen Wide fix (images used to get out from the tv screen from the side (fixed)).
      • Other little tweaks.
      • Enhance JPG Quality.
      • Interface Set to English.
      • Disable logcat – Android Logger.
      • Disable Extended JNI Checks.
      • Improve performance in video playback and streaming.
      • Added Googles DNS.
      • Improve Scrolling Responsiveness.
      • Bootanimation added.


      3 - Ads Block via host file - update using adblock
      4 - "Google blocking apps writing to SD cards" (fix).
      5 - Default WallPaper changed
      6 - Instalation menu options and updates.
      7 - init.rc enabled
      8 - Framework tweak (mouse pointer Resize 50% smaller Than original).
      9 - Rooted
      10 - wifi tweaks
      11 - Droidmote (ready)

      Many more tweaks done, including installation of settings for some of the main apps.


      There is both a 4Gb and 8Gb version - Choose the right one for your device.

      Download Link:

      8GB Version:
      https://www.dropbox.com/sh/t6hx8106e...8Gb-v1.rom.rar
      4GB Version: https://www.dropbox.com/sh/t6hx8106e...4Gb-v1.rom.rar

      Release History:-
      V1 -- 1st public release - 7 Sept

      Known bugs:-
      Opera seems to need lauched twice, I have no idea why, it works but closes on the first lauch.

      See HERE for details on how to flash the rom, use this downloaded rom inplace of the stock in the instructions, and you should only need lk.rom loaded but NOT checked only the rom should be ticked for installation. (This is the case with the 8Gb rom)

      Comment


        #4
        How to - Building the Linux Kernel 3.0.8 For CX-01

        Thank you CNXSoft for this article.

        Yesterday, we got Linux kernel 3.0.8 source code from Telechips, as well as some files related to Android 4.0 (Webkit + OMX). Today, I’ve had a look at the kernel source code and found a few very interesting things.

        First let’s get the code from github:

        git clone git://github.com/cnxsoft/telechips-linux.git
        Good news! The code for the latest Telechips TCC892X is present in arch/arm/mach-tcc892x, and there is support for 3 types of boards:
        • board-m805_892x – TCC8923 M805 board
        • board-tcc8920 – TCC8920 evaluation board
        • board-tcc8920st – TCC8920 STB evaluation board


        TCC8920 STB evaluation board appears to be relevant to products such as Diyomate A6, but if it’s also used for TCC8925 HDMI Dongle such as CX-01 mini PC, Zero Devices Z900 or ValuePlus TizzBird N1.

        Now let’s have a look at the default config directory for arm (arch/arm/configs):

        ls | grep tcc89
        tcc8920st_defconfig
        tcc8920st_hdb892s_defconfig
        tcc8925st_dongle_defconfig
        tcc8925st_donglehs_defconfig
        tcc8925st_hdb892f_defconfig
        tcc8925st_isdbt_module_defconfig
        tcc892x_defconfig
        Nice! tcc8925st_dongle_defconfig and tcc8925st_donglehs_defconfig look particularly interesting!


        A quick comparison shows that the only difference is that tcc8925st_donglehs_defconfig sets CONFIG_HDMI_DONGLE_CLOCK_HIGH_SPEED=y.

        Looking further in the source code:

        #define TCC_CPU_FREQ_HIGH_SPEED 812500
        #define TCC_CPU_FREQ_NORMAL_SPEED 716500
        So tcc8925st_dongle_defconfig configuration file sets TCC8925 to run at 716.5 MHz and tcc8925st_donglehs_defconfig to 812.5 MHz.

        The kernel configuration enables the Android stuff, so it’s probably the kernel we’ve got in the device running Android. Let’s try to build the kernel with TCC8925 clocked at 812.5 Mhz (High Speed config) assuming you’ve got the ARM toolchain already installed (run apt-get install gcc-arm-linux-gnueabihf in Ubuntu, if you don’t):

        make ARCH=arm tcc8925st_donglehs_defconfig
        make ARCH=arm CROSS_COMPILE=arm-linux-gnueabihf- -j2 uImage
        ....
        Image Name: Linux-3.0.8+
        Created: Wed Jul 18 20:22:07 2012
        Image Type: ARM Linux Kernel Image (uncompressed)
        Data Size: 3136392 Bytes = 3062.88 kB = 2.99 MB
        Load Address: 10008000
        Entry Point: 10008000
        Image arch/arm/boot/uImage is ready


        NOTE: read the article How to Create a Custom Android Firmware for CX-01 mini PC it has important information about how to compile the kernell for exactly the CX-01
        Build new kernel
        You may need to re-build the kernel and some modules to add features or apply stability / performance patches.
        The instructions are available in Building the Linux Kernel 3.0.8 For Telechips TCC8925 mini PCs, but use cx-01 config instead:
        make ARCH=arm tcc8920st_cx-01_defconfig
        tcc8920st_cx-01_defconfig is the config file extracted from /proc/config.gz in CX-01 HDMI stick.
        After build, the kernel binary is available as arch/arm/boot/Image.


        Good! It can build! We now have got the kernel (zImage and uImage) in arch/arm/boot. Let’s build the kernel modules:
        make ARCH=arm CROSS_COMPILE=arm-linux-gnueabihf- -j2 uImage INSTALL_MOD_PATH=build_modules modules
        make ARCH=arm CROSS_COMPILE=arm-linux-gnueabihf- -j2 uImage INSTALL_MOD_PATH=build_modules modules_install
        The kernel modules are located in build_modules directory. There are only 2 kernel modules: gspca_main.ko (video driver) and scsi_wait_scan.ko.

        I cannot give it a try now, as I haven’t received the hardware yet. The other thing I would like to get before hacking CX-01 mini PC is a recovery firmware, and the eventual tools to recover the device when something bad happens. I’ve contacted PandaWill to try to get it. The bootloader code would also be nice, but not an absolute must. However, I believe it’s unlikely we’ll get the bootloader source code since Telechips does not appear to have released it for the older versions of its TCC processors.

        SOURCE: http://www.cnx-software.com/2012/07/...0-tizzbird-n1/

        Comment


          #5
          How To - Tatubias tweak patch for CX-01

          This was already posted but im cleaning a little the forum. this links has the tatubias tweak 0.4a it has some typos fixed of the original 0.4


          ALWAYS DO BACK UP OF YOUR SYSTEM BEFORE INSTALLING ANY PATCH (BETA SCRIPT)

          ok here it is the Tatubias tweak 0.4a beta for the CX-01 device.

          Tweak patch. for rom version - CX1-V1.0-v12.05_r1-4096-8189-en


          1 - Stable Android Market.

          2 - build.prop Tweaks.
          * Full Market.
          * Improve touch responsiveness through Hardware Rendering.
          * GPU try to handle User interface.
          * Some other video performances added.
          * Max events UI can handle in 1s set to 240.
          * Increase "touch" responsiveness.
          * Dalvik Tweak updated Values 15 August.
          * Screen Wide fix (images used to get out from the tv screen from the side (fixed)).
          * Other little tweaks.
          * Enhance JPG Quality.
          * Interface Set to English.
          * Disable logcat – Android Logger.
          * Disable Extended JNI Checks.
          * Improve performance in video playback and streaming.
          * Added Googles DNS.
          * Improve Scrolling Responsiveness.
          * Bootanimation added.

          3 - Ads Block.
          4 - "Google blocking apps writing to SD cards" (fix).
          5 - Installs any apk that is inside the apk directory (dont put apks with Spaces in their name edit them first).
          6 - Instalation menu options and updates.
          7 - Dalvik cache Cleaning.
          8 - Framwork tweak (mouse pointer Resize 50% smaller Than original).
          9 - Install WIFI ADB into /system/app directory. ( this is for you sending commands like this script Thought WIFI to the cx-01)


          Download: http://www.4shared.com/zip/-Fn3219d/...k_Fix_04a.html


          How to install:

          1 - Root the cx-01
          2 - un compress the cx-01CX-01 Tatubias Tweak Fix 0.4a
          3 - copy any apk that you want to auto install alone into the apk directory
          4 - connect the cx-01 to the PC and wait some minutes until is finished to boot.
          5 - run the patch.bat file
          6 - reboot

          That´s all

          Comment


            #6
            How To - Map NFS shares with CX-01

            I have been playing with my cx-01 again.
            Now I use Linux 100% of the time, so I use nfs shares not cifs shares.
            On the cx-01 to map drives from nfs servers use the following format:-
            Code:
            #!/bin/sh
            mo="busybox mount -o nolock,ro,hard,intr,vers=3,proto=tcp,rsize=4096,wsize=4096 -t nfs "
            $mo <share> <mount point>
            e.g. share is nas:/exports/TV and mount point is a folder called TV under /sdcard
            Code:
            $mo nas:/exports/TV /sdcard/TV
            You don't have to use the mo= line but if you are mounting several shares it saves typing

            Comment


              #7
              How To - usb nic &amp; Logitec drivers For CX-01 Custom rom only.

              Download the modules.7z from here

              Copy the .7z file to the cx-01
              extract it there using a file manager
              Make sure the /system is WRITEABLE (its a setting in the file manager)
              Move the CONTENTS of modules to /system/lib/modules/
              Change the owner to root:root on the new ones
              Move the CONTENTS of init.d to /system/etc/init.d/
              Change the permissions of 08setperm to 777 (or all on)
              Change the owner to root:root on the new ones
              Sync (open terminal and enter su <enter>sync<enter) or wait for a few minutes so the changes are fixed.
              Reboot with your devices connected - if using a usb nic then it must be connected to the hub for it to work.

              You should get an ipaddress from the router via the usb nic - I have only tested with an asix (Ax88x72A) as that is the only one recognised that I have.

              (The above is included in the .7z file)

              When you have done all the above, checking /system/lib/modules should show the extra modules you have installed there, and /system/etc/init.d shoud have 2 extra files in it 08* and 50*.

              With this you can use a logitec* wifi keyboard/mouse and a usb lan adaptor - bypassing the crappy wifi on these devices. You WILL need to PURCHASE a dongle but they can be found for a few £'s on **** etc.
              Make sure you get a dongle with an Asix chipset though.
              *You Don't NEED a logitec keyboard but if you have one it will install the driver for it

              NB This will NOT WORK ON A STANDARD ROM/FIRMWARE it requires the extra features I have built into my custom rom.
              As new drivers are built I will add them to the files.

              As I said in the wifi thread I am looking for drivers for:-
              DM9601

              Update 23/1/12
              Updated with RTL8150 & Pegasus I&II drivers.
              If you have d/led the origional 7z just redownload it and it will now have all the drivers I have in it.

              Comment


                #8
                How to - pack tccutils. (telechips pack un pack roms)

                How to pack tccutils.

                Compiling applications needed:

                based on debian linux: sudo apt-get install gcc libssl-dev git

                Code:
                [B][SIZE=4]Compiling the tools[/SIZE][/B]
                
                $ mkdir rom
                $ cd rom
                $ git clone https://github.com/naobsd/tccutils.git
                $ cd tccutils/
                $ cc -o tccpack tccpack.c
                $ cc -o tccunpack tccunpack.c
                $ cd ../
                
                $ git clone -b ics-telechips-naobsd https://github.com/naobsd/cm_system_core.git
                $ cd cm_system_core/mkbootimg/
                $ cc -o mkbootimg mkbootimg.c -lcrypto
                $ cc -o unpackbootimg unpackbootimg.c
                $ cd ../../
                
                $ git clone -b ics-telechips-naobsd https://github.com/naobsd/cm_external_yaffs2.git
                $ cd cm_external_yaffs2/yaffs2/utils/
                $ make mkyaffs2image
                $ cd ../../../
                
                $ git clone https://github.com/ehlers/unyaffs.git
                $ cd unyaffs/
                $ make
                $ cd ../
                
                Copy compiled binaries to somewhere you like.

                Code:
                [B][SIZE=4]using tools[/SIZE][/B]
                
                [B]MTD image[/B]
                
                $ tccunpack MTD.img
                (boot.img, system.img, and recovery.img will be extracted)
                $ tccpack boot.img system.img recovery.img MTD_new.img
                
                boot.img/recovery.img
                
                $ unpackbootimg -i boot.img
                $ mkdir ramdisk
                $ cd ramdisk
                $ gzip -cd ../boot.img-ramdisk.gz | cpio -i
                (modify files)
                $ find * | cpio -o -H newc | gzip -9 > ../boot.img-ramdisk_new.gz
                $ cd ../
                $ mkbootimg --kernel boot.img-zImage --ramdisk boot.img-ramdisk_new.gz --cmdline `boot.img-cmdline` --base 0x`boot.img-base` --pagesize `boot.img-pagesize` -o boot_new.img
                
                system.img
                
                $ unyaffs -d system.img
                (check page(chunk) size and spare size)
                $ sudo unyaffs system.img system
                $ cd system
                (modify files)
                $ cd ../
                $ cd system
                $ sudo mkyaffs2image -c (PAGESIZE, e.g. 4096(not 4)) -s (SPARESIZE, e.g. 128) . ../system_new.img
                
                [B]Example for 4gb: sudo mkyaffs2image -c 4096 -s 128 . ../system_new.img
                Example for 8gb: sudo mkyaffs2image -c 8192 -s 256 . ../system_new.img[/B]


                source: http://androtab.info/arm/telechips/customize-firmware/

                Comment


                  #9
                  How To - Repack scripts telechip roms (CX-01)

                  The full scripts are shown below.

                  ex.sh
                  Code:
                  #!/bin/bash
                  PATH=~/bin:$PATH # delete if you have your tcc* etc files in a different location
                  tccunpack CX1*en.rom
                  unpackbootimg -i boot.img
                  mkdir ramdisk
                  cd ramdisk
                  gunzip -cd ../boot.img-ramdisk.gz | cpio -i 
                  cd ..
                  mkdir system
                  unyaffs -d system.img
                  unyaffs system.img system
                  mk.sh
                  Code:
                  #!/bin/bash
                  PATH=~/bin:$PATH # delete if you have your tcc* etc files in a different location
                  if [ "$1" = "8" ]; then
                      page=8192
                      step=256
                  else    
                      page=4096    
                      step=128
                  fi
                  echo Page=$page Step=$step
                  cd system
                  mkyaffs2image -c $page -s $step . ../system_new.img
                  
                  cd ..
                  tccpack boot.img system_new.img recovery.img CX-01.$1v0.0.rom
                  use mk.sh 8 to make an 8Gb rom defaults to a 4Gb one.
                  I use ~/bin to hold my compiled files, like tccpack etc then the "PATH=~/bin:$PATH " adds the ~/bin to the path while the script is running, you can delete it if you have the files already in the path or ~/bin in you path already.

                  Comment


                    #10
                    How to Create a Custom Android Firmware for CX-01 mini PC

                    Special thanks to Hairybiker for his scripts also fun for his utilities

                    1 - Download The ROMs (in the rar are for the 4gb and 8gb device):
                    Official roms: http://www.pandawillforum.com/soft/R...TV%20CX-01.rar


                    2 - Download the tccUtils (already compiled)
                    * - Follow the upper post related tccutils.


                    3 - Download Un Packing / Packing Scripts
                    * - Follow the upper post related tccutils.


                    4 - a) if you are running as root copy the tccutils and packing and unpacking scripts into /sbin
                    b) if you are running as a user copy tccutils and packing and unpacking scripts into ~/bin


                    5 - un pack the rom ROM for android TV CX-01.rar

                    You will get 2 directories:
                    V1.0-4096-8189_en (Directory for 4GB firmware)
                    CX1-V1.0-4096-8189_en.rom (this is the file we are interested for 4gb version)
                    lk.rom
                    NAND Data.fai

                    V1.0-8192-8189_en (Directory for 8GB firmware)
                    CX1-V1.0-8192-8189_en.rom (this is the file we are interested for 8gb version)
                    lk.rom

                    Note: this example will be with the 4gb file (CX1-V1.0-4096-8189_en.rom ).

                    Make a directory called ROM
                    copy CX1-V1.0-4096-8189_en.rom into the ROM directory.
                    enter to the ROM directory and run:

                    Code:
                    sudo ex.sh
                    This will un pack all the rom and will also unpack the boot.img

                    Make all the changes you are interested in.

                    Then run:

                    Code:
                     sudo mkall.sh
                    This will repack all the system img and the boot image and will provide a final ROM to be flashed into the cx-01 called: CX-01.v0.0.rom

                    note: if you are packing the 8gb version run the following command.
                    Code:
                     sudo mkall.sh 8

                    Extras:

                    Tccutils soruces:http://androtab.info/arm/telechips/customize-firmware/
                    To be able to compile applications run and install all dependencies: sudo apt-get install gcc libssl-dev git


                    Un packing Packing Scripts:

                    Code:
                    #!/bin/bash
                    PATH=~/bin:$PATH
                    tccunpack CX1*en.rom
                    unpackbootimg -i boot.img
                    mkdir ramdisk
                    cd ramdisk
                    gunzip -cd ../boot.img-ramdisk.gz | cpio -i 
                    cd ..
                    mkdir system
                    unyaffs -d system.img
                    unyaffs system.img system
                    Make complete Rom

                    Code:
                    #!/bin/bash
                    PATH=~/bin:$PATH
                    if ( "$1" == "8") then
                        page=8192
                        step=256
                    else    
                        page=4096    
                        step=128
                    fi
                    
                    cd system
                    mkyaffs2image -c $page -s $step . ../system_new.img
                    
                    cd ..
                    
                    cd ramdisk
                    find . | cpio -o -H newc | gzip -9 > ../ramdisk_new.gz
                    cd .. 
                    mkbootimg --kernel boot.img-zImage --ramdisk ramdisk_new.gz --cmdline "console=null" --base 0x80000000 --pagesize $page -o boot_new.img
                    tccpack boot_new.img system_new.img recovery.img CX-01.v0.0.rom
                    This script does only compile the System and build the rom.

                    Code:
                    #!/bin/bash
                    PATH=~/bin:$PATH
                    if [ "$1" = "8" ]; then
                        page=8192
                        step=256
                    else    
                        page=4096    
                        step=128
                    fi
                    echo Page=$page Step=$step
                    cd system
                    mkyaffs2image -c $page -s $step . ../system_new.img
                    
                    cd ..
                    tccpack boot.img system_new.img recovery.img CX-01.$1v0.0.rom

                    Comment


                      #11
                      Thanks to sambartle on pandawill forum this is the latest official cx-01 rom, is the best one and has nothing to compare with other ones.

                      I suggest to everyone!!!

                      Compiled .ROM (4GB Device): http://ul.to/1kx3h1w4

                      Use with
                      lk.rom – BOOT
                      NAND Data.fai – NAND Data

                      Like in the above Tatubias' post.

                      It will give a second life to your cx-01. Will make it shine.

                      Comment


                        #12
                        Originally posted by canadien View Post
                        Thanks to sambartle on pandawill forum this is the latest official cx-01 rom, is the best one and has nothing to compare with other ones.

                        I suggest to everyone!!!

                        Compiled .ROM (4GB Device): http://ul.to/1kx3h1w4

                        Use with
                        lk.rom – BOOT
                        NAND Data.fai – NAND Data

                        Like in the above Tatubias' post.

                        It will give a second life to your cx-01. Will make it shine.

                        its a newerr one?
                        be carefull therare clones of the cx-01 and the wifi chip is different.

                        let me know how did you went.

                        im not providing more support on any pandawill forum .

                        yes the best post and support on the cx-01 was at pandwill forum. but no longer the people that was helping there also my self does not help panda will any more.

                        Comment


                          #13
                          Originally posted by tatubias View Post
                          its a newerr one?
                          be carefull therare clones of the cx-01 and the wifi chip is different.

                          let me know how did you went.

                          im not providing more support on any pandawill forum .

                          yes the best post and support on the cx-01 was at pandwill forum. but no longer the people that was helping there also my self does not help panda will any more.
                          I know hairybiker had a dispute with pandawillforum admin saying he was lacking of support from them but never explicitly told what was the dispute about.

                          I was in the first buyers batch and followed you pdw thread from the beginning. This one is really much faster then all the others you posted. Browsing is faster, there is a turn off button and is encapsulated into two default launchers. You should give a try and come back here to tell us ;-) I just updated recently and did not try much apps yet. But just for browsing it's worth it.

                          Comment


                            #14
                            Originally posted by canadien View Post
                            I know hairybiker had a dispute with pandawillforum admin saying he was lacking of support from them but never explicitly told what was the dispute about.

                            I was in the first buyers batch and followed you pdw thread from the beginning. This one is really much faster then all the others you posted. Browsing is faster, there is a turn off button and is encapsulated into two default launchers. You should give a try and come back here to tell us ;-) I just updated recently and did not try much apps yet. But just for browsing it's worth it.
                            good to know i have sent an email to hairybiker letting him know

                            Comment


                              #15
                              Originally posted by tatubias View Post
                              good to know i have sent an email to hairybiker letting him know
                              I think he already know since he left the forum some time after this was posted by smbartle/gtrmnc...

                              Comment

                              Working...
                              X