Announcement

Collapse
No announcement yet.

Announcement

Collapse
No announcement yet.

Help to Unbrick a Hard Bricked MK809III RK3188T

Collapse
X
 
  • Filter
  • Time
  • Show
Clear All
new posts

    Help to Unbrick a Hard Bricked MK809III RK3188T

    I think I royally messed up my stick. See this post here: http://www.freaktab.com/showthread.p...quot-Shut-down

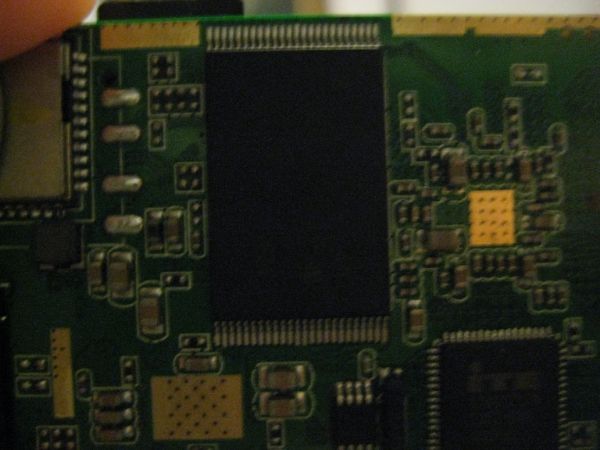
    So now I need to unbrick it, but I don't know which pins to short out. I'm really afraid of shorting out the wrong pins. Can someone please point them out? Or maybe the principle to locating them? I know where the NAND chip is (it's the big one), but there are all sorts of pins around it.

    Here is a picture:


    #2
    If this helps any, the processor chip says "SBAU32V8 1404". Maybe I don't know where the NAND is? Is the NAND the same as the processor? I really don't know what I'm doing. On the other side of the stick (the side I didn't take a picture of), I lifted up this grey soft pad thing (I assume it's some sort of heat sink?) and saw the processor chip with "Rockchip RK3188-T" on it and then those numbers (SBAU32V8 1404).

    Comment


      #3
      Originally posted by threehappypenguins View Post
      If this helps any, the processor chip says "SBAU32V8 1404". Maybe I don't know where the NAND is? Is the NAND the same as the processor? I really don't know what I'm doing. On the other side of the stick (the side I didn't take a picture of), I lifted up this grey soft pad thing (I assume it's some sort of heat sink?) and saw the processor chip with "Rockchip RK3188-T" on it and then those numbers (SBAU32V8 1404).

      Hello the nand chip is the big chip in your photo,You will see a dot on one of the corners of that chip count from that dot to pin 7&8 they are the pins to short
      Please consider making a Donation to freakTab

      Comment


        #4
        Yes, I see the dot in the bottom left-hand corner of the chip. But the dot is exactly between the second and third "spider leg" things (are they pins) that line the bottom and top of the chip.

        Are you talking about the "spider leg" things? If so, do I count the third one in as "pin 1"? Or do I start from the very left and count that as "pin 1"?

        Sorry, I'm not sure what you mean.

        Originally posted by blinkone View Post
        Hello the nand chip is the big chip in your photo,You will see a dot on one of the corners of that chip count from that dot to pin 7&8 they are the pins to short

        Comment


          #5
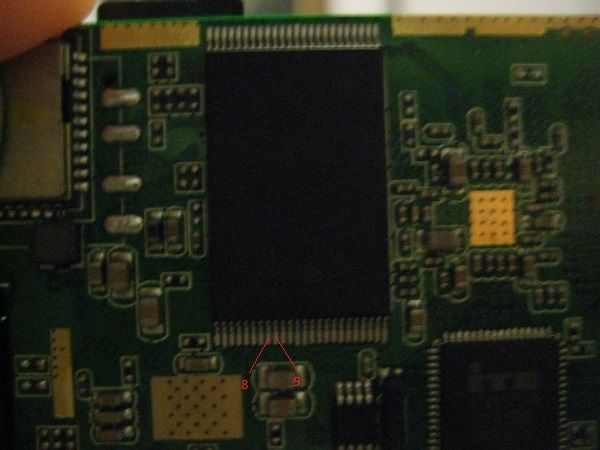
          Is this it?

          If so, what exactly do I do to "short" the pins? I have a paperclip. Do I make it so that I'm touching both pins at the same time with the paperclip? Is that what it means?

          Comment


            #6
            Originally posted by threehappypenguins View Post
            Yes, I see the dot in the bottom left-hand corner of the chip. But the dot is exactly between the second and third "spider leg" things (are they pins) that line the bottom and top of the chip.

            Are you talking about the "spider leg" things? If so, do I count the third one in as "pin 1"? Or do I start from the very left and count that as "pin 1"?

            Sorry, I'm not sure what you mean.
            Ok look hear http://www.freaktab.com/showthread.p...D-on-the-MK808 different devices yes but the same principle.some times its pin 6&7 some times its pin 7&8 & some times its 8&9 it seems to varey device to device..& yes the pins are what you call spider legs..the first leg on the corner of the chip by the dot is pin one
            Please consider making a Donation to freakTab

            Comment


              #7
              Originally posted by threehappypenguins View Post
              Is this it?

              If so, what exactly do I do to "short" the pins? I have a paperclip. Do I make it so that I'm touching both pins at the same time with the paperclip? Is that what it means?

              Yes use a paper clip & touch the two pins together at the same time you plug it in to your pc (you need 3 hands for this job)
              Please consider making a Donation to freakTab

              Comment


                #8
                SUCCESS!!!

                I was able to do it with two hands.

                First, I plugged in the mini USB part into the side of the stick. Then I "partially" plugged in the USB into the computer (by partially, I mean I plugged it in just enough so that it stayed, but not enough to actually be plugged in). Then I put the paper clip on pin one and counted them one by one with the paperclip physically touching (all with my left hand). Otherwise I would lose count of which pin I was on. Once I located pin 8, I put the paperclip over top of pins 8 & 9 (right in between them) so it was touching both.

                While I was holding the paper clip with my left hand, I then put the USB into the computer all the way, the stick lit up, and then I waited a couple of seconds. Then I heard that "da-dum" sound the computer makes when you plug something into the USB port (hardware detection).

                Now, this is where I would typically run into trouble. I've posted on here in the past because I had troubles with Windows 8.1. So since I was starting fresh. I had previously given up on Windows 8.1, and went ahead and reinstalled Windows 8 (which originally came with my computer). That was a huge pain in the arse since I had to basically format and start over (lost all my files; but they were backed up). All was well with the drivers and my TV stick with Windows 8. But I kept getting the warnings to upgrade to Windows 8.1, but obviously I declined. But then one day the stupid OS MADE ME upgrade. It actually FORCED my computer into an upgrade. So I was back at square one with Windows 8.1. So I decided to do it this way since my computer was starting fresh.

                After it detected the stick, I unzipped the Rockchip Driver Assistant. I then ran the DriverInstall.exe file. Then I opened the "USB Fix for Windows 8.1" folder and followed the readme instructions.

                Then I unzipped ncr_31_mk809III_kitkat.zip and opened the "RKDevelopTool_v1.37" folder and edited the setting.ini file. I changed "SUPPORTUSB11=0" to "SUPPORTUSB11=1" and saved the file.

                When I opened RKAndroidTool.exe, I saw that it said it was found. I pressed EraseIDB. It erased fine. I made sure the Loader was checked off (it was), as well as everything else (except backup), and clicked Run.

                Everything ran just fine. I plugged my stick in the TV, it took a while to boot up initially (black screen for a while), I left the room, came back, and VOILA! It worked!!!
                Last edited by threehappypenguins; 08 November 2014, 20:33.

                Comment


                  #9
                  By the way...

                  What do you think botched my NAND? Was it because I unplugged it while XBMC was in the middle of playing something? Is it always unsafe to just unplug or turn off the TV (if USB powered by the TV) without using the "shut down" feature?

                  Comment


                    #10
                    Originally posted by threehappypenguins View Post
                    By the way...

                    What do you think botched my NAND? Was it because I unplugged it while XBMC was in the middle of playing something? Is it always unsafe to just unplug or turn off the TV (if USB powered by the TV) without using the "shut down" feature?
                    Glad you got it working anyway ,Your nand may have gotten corrupted when you unplugged it wile it was still running but that will not always happen it only happens sometimes but always best to shut it down with the shut down button to be safe
                    Please consider making a Donation to freakTab

                    Comment


                      #11
                      Oh, and blinkone, I wanted to say thanks for your help as well. I really appreciate it.

                      One other question. In the link you provided, it shows that the NAND chip was under a heat sink. I didn't appear to have a heat sink over the NAND chip. Isn't that bad? The heat sink (at least, I think it's a heat sink; it's this grey rubbery foam pad thing) is on the other side of the stick over top what I assume is the processor.

                      Comment


                        #12
                        I wish there was some way to make it automatically go through the shut down when you turn off your TV if it is USB powered. I don't mind going to the shut down, but I am planning on getting the stick for my in-laws. I wanted to make it as much like a Smart TV as possible. My mother-in-law would probably end up constantly just pressing the off button on the remote and not going through the motions of shut down.

                        Alternatively, I could plug it directly into the wall. But if they left it running all the time, would that damage it?

                        Originally posted by blinkone View Post
                        Glad you got it working anyway ,Your nand may have gotten corrupted when you unplugged it wile it was still running but that will not always happen it only happens sometimes but always best to shut it down with the shut down button to be safe

                        Comment


                          #13
                          Originally posted by threehappypenguins View Post
                          I wish there was some way to make it automatically go through the shut down when you turn off your TV if it is USB powered. I don't mind going to the shut down, but I am planning on getting the stick for my in-laws. I wanted to make it as much like a Smart TV as possible. My mother-in-law would probably end up constantly just pressing the off button on the remote and not going through the motions of shut down.

                          Alternatively, I could plug it directly into the wall. But if they left it running all the time, would that damage it?
                          Your best off NOT to power your stick from your TV's usb port as it will only be 500ma witch is not rely enough you need 2000ma or more.if you power it from a ac adapter wall socket you could leave it on 24/7 it will be fine it will not hurt nothing nor use much power,,You will only run into problems powering it from your TV's usb it will cash, lock up ect best to use external power
                          Please consider making a Donation to freakTab

                          Comment

                          Working...
                          X