-
-
Double Driver
The one Program every person with an Intel box must have.
For those that don't know this will make a backup of the current Windows drivers from your working intel device, Box, Tablet, laptop etc.
Before you start tinkering and start thinking you know more than Microsoft Windows.
Install and run this program
It will make a backup of current windows drivers in your working system, (put in a safe and easy to remember place)
When you do updates etc create another backup of new drivers.
Double Driver
Comment
-
Some features that can be Turned off in Windows 10 Features if not required may save a bit of space/resources on these mini PC's Microsoft operating systems ship with features, several of them enabled by default, that many Windows users may not need when it comes to running the computer.
These features are enabled for compatibility purposes, and while that is a good thing, may use memory, cpu cycles, or even expose the device to attacks or security issues.
The following guide lists installed features on Microsoft's operating system Windows 10, and their purpose.
The guide explains what each feature is designed for, and whether it makes sense to disable the feature on your machine.
Obviously, you don't want to disable or turn off features that you require, but since it is a simple "flip a switch" process, it is easy enough to restore functionality should you experience any issues after turning off features.
Readmore gHacks.netComment
-
Good points.
It's amazing how many unneeded services can hog resources.
R-TV BOX S10, Beebox N3150, Chuwi Hibox, Nvidia Shield, A95X MaxComment
-
Another handy program remove more those things you don't need on you Mini Windows PC.
Geek Uninstaller: remove Windows apps
The latest version of Geek Uninstaller, a third-party solution for Windows to remove installed software, supports removing Windows apps.
Geek Uninstaller is one of a handful of programs that you can use as an alternative for Windows' built-in uninstaller.
Just like Revo Uninstaller and others, it supports not only the removal of programs, but also the scanning for leftovers so that traces left on the device after uninstallation are removed as well.
The most recent update of Geek Uninstaller, version 1.4.0.82, introduced support for Windows Store applications to the desktop program.
ghacks.netComment
-
Comment
-
Improve YouTube Video Playback on Low Power Intel mini PCs by Disabling VP9 Support in Chrome or Firefox
CNXSoft been reviewing several Intel Bay Trail, Cherry Trail, and Braswell mini PCs in the last year or so, and I always end up recommending Microsoft Edge browser over Firefox or Chrome for people wanting to watch YouTube videos, as the last two browsers always drop many frames with the video stuttering regularly. However I noticed that while Edge is playing MP4/AVC (H.264) video, the other two browser would normally stream WebM/VP9 videos, and it could be the cause of the problem as H.264 can be hardware accelerated, but VP9 not, and the low power processor might not quite powerful enough to handle 1080p VP9 video decoding smoothly. CNXSoft investigated the issues with Vorke V1 mini PC powered by an Intel Celeron J3160 processor (6W TDP) with the three browsers by first checking enabled codecs in YouTube HTML5 page.
Read Full Story :CNXSoftComment
-
Windows 10 64bit Cherry Trail (x5-Z8000 family) chip-set drivers (includes battery-sensor and others.)
http://dlcdnet.asus.com/pub/ASUS/nb/..._64_VER103.zip
From ASUS.com but they are generic drivers signed by Intel and with a proper installer.
Works for my Cube iWork8 Air. Not available from Intel.comComment
-
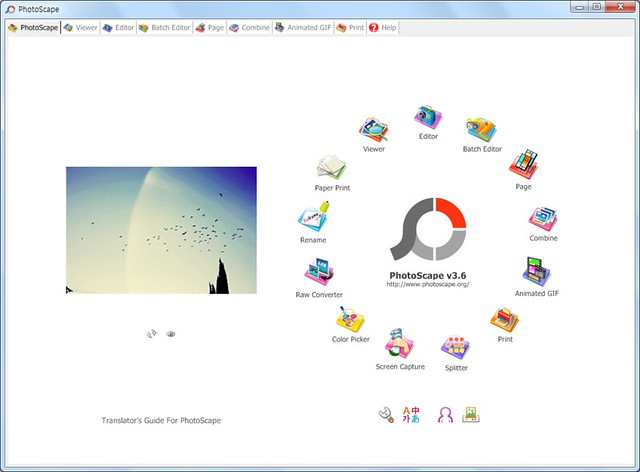
Photoscape is a cute little photo editor with some neat features, such as an animated GIF maker and photo combiner.
And at everybody's favorite price.
Comment
-
DXVA Checker
A tool to check about DirectX Video Acceleration (DXVA) capabilities of your SOC.
http://bluesky23.yukishigure.com/en/DXVAChecker.htmlR-TV BOX S10, Beebox N3150, Chuwi Hibox, Nvidia Shield, A95X MaxComment
-
For those that like to have a bit of a fiddle, Change the Colour theme of your Windows10
what could go possible wrong...
Fluent XAML Theme Editor Preview released!
By Kalita Saintonge / Program Manager, Windows Developer Team
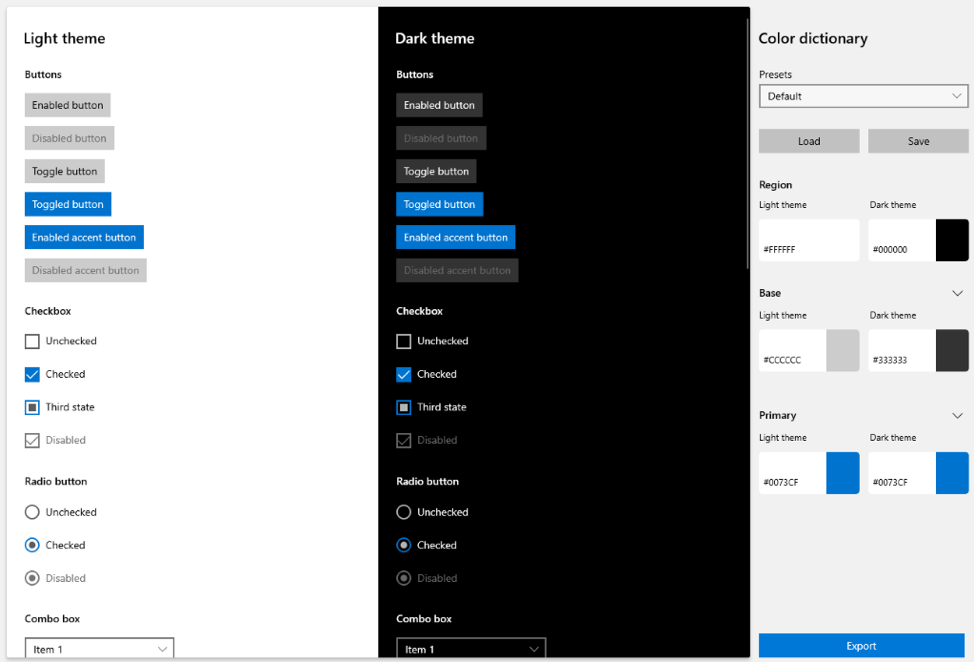 We’re excited to announce the preview release of the Fluent XAML Theme Editor application!
As some of you may remember from our Build 2018 session this year, we previewed a tool using our new ColorPaletteResources API that allows you to set the color theme of your app through some simple color selections.
This tool is now publicly available to insiders and those running on pre-release builds (Windows 10 SDK Preview Build 17723 or newer) to test out on our GitHub repository! How to use the Fluent XAML Theme Editor
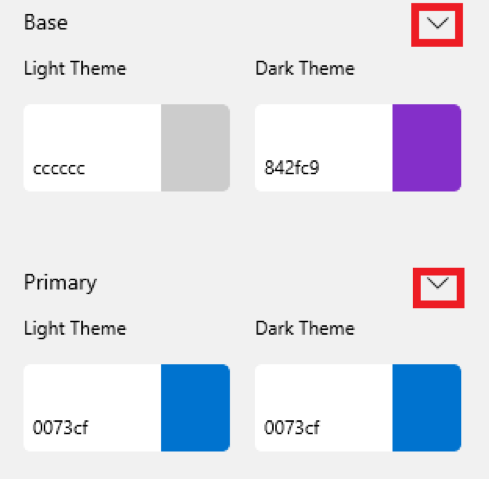
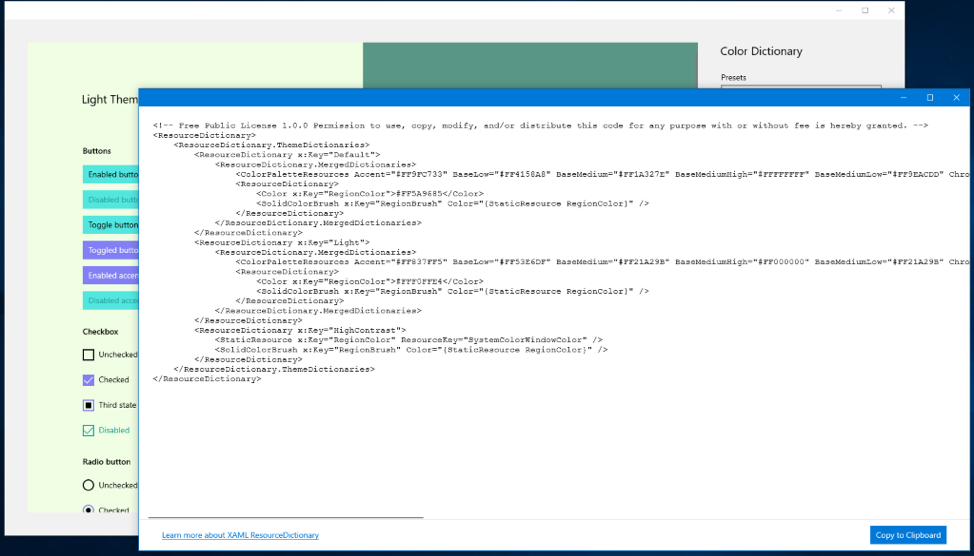
With the preview build, you can select three major colors for both the Light and Dark themes in the right-hand properties view labeled “Color Dictionary”:
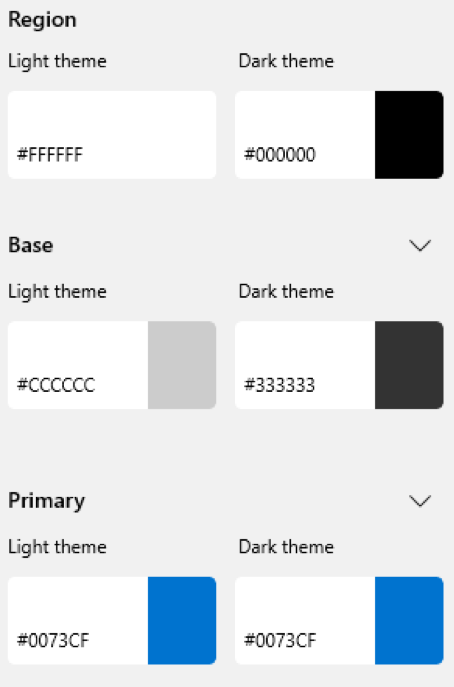
- Region – The background that all the controls sit on, which is a separate resource that does not exist in our framework.
- Base – Represents all our controls’ backplates and their temporary state visuals like hover or press. In general, Base should be in contrast with the background (or Region color) of your theme and with black text (if in Light theme) and white text (if in Dark theme).
- Primary – This is essentially the Accent color and should contrast with mainly white text.
It is used in more choice locations to show alternate rest states for toggled controls like list selection, checkbox or radiobutton checked states, slider fill values, and other control parts that need to be shown as different from their default rest state once interacted with. Refining the colors
In addition to the three major colors for each theme, you can also expand any one of the major colors to see a list of minor colors that change the color on certain controls on a more refined level.
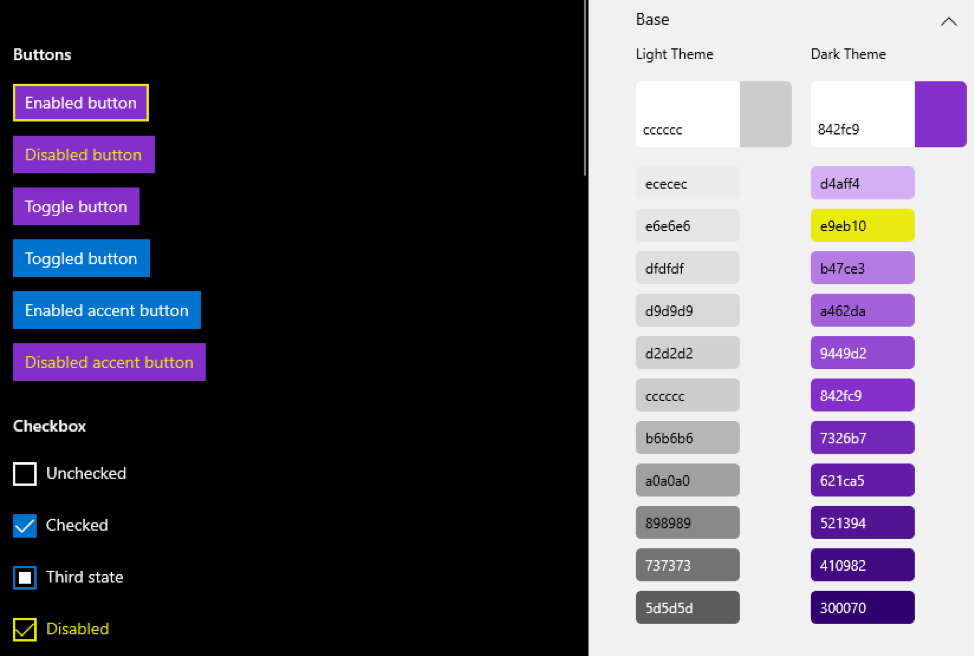
In the above example, you’ll notice that although my major Base color is purple in Dark Theme, I can override that second gradient value to be yellow to change the borders and disabled color of controls.
To access the detailed view of colors, simply click the chevron next to the major color buttons:
 Creating, saving and loading presets
The editor will ship with some presets for you to look at to get an idea of what a theme looks like in the app.
The preset dropdown is located at the top of the Color Dictionary properties panel.
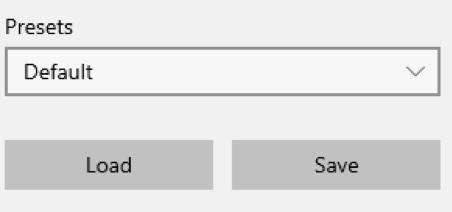
When you first boot up it will always be set to Default – which is the Light and Dark theme styling default for all our controls. You can select different themes like Lavender and Nighttime to get an idea of how the tool will theme our controls.
Once you’re ready to start making your own theme, just start editing the colors! Once you’ve started tweaking them, you’ll notice that the Presets ComboBox goes from the name of the preset to “Custom”:
This means that you’ve started a new temporary theme that’s “Custom.” Any changes you make will not affect any of the other Presets in that box.- Once you’re satisfied with the changes you’ve made, simply click the “Save” button and browse to your desired save point.
- Similarly, you can open your saved JSON theme by clicking the “Load” button and browsing to your saved theme’s file location.
Lastly, one of the most important parts of creating your theme needs to be making sure that in either respective theme you are contrast compliant. The tool provides you with a small list of contrast information on the left-hand side of the color selection window when choosing your color.
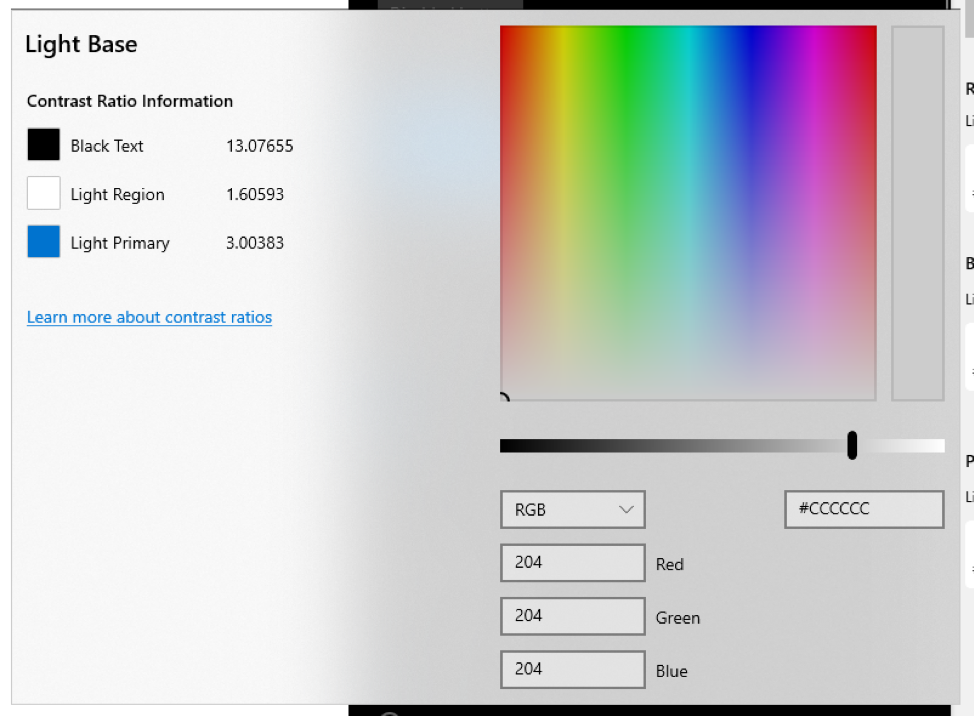
In this window you can see your contrast with the most prevalent text color in the theme that you’re choosing to edit, in the above case black text because you are editing a Light theme color value.
When you pick a color that falls below the standard contrast ratio of 4.5:1, you’ll be alerted with red text next to your contrast value.
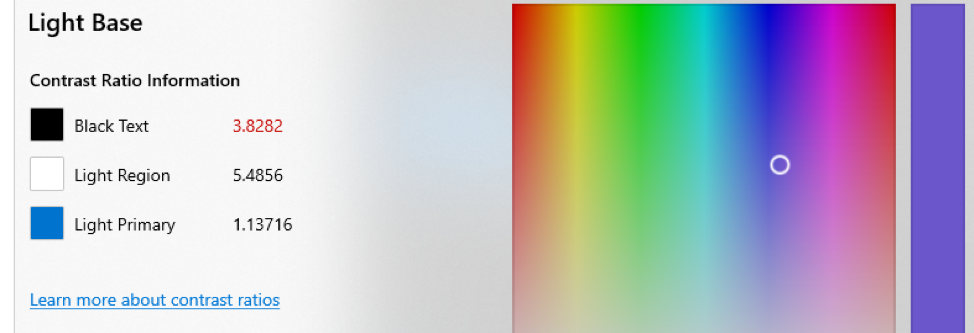
You can learn more about contrast ratios and their importance here. Exporting and using your theme in an app
Of course, once you’ve themed everything, you’ll want to use in your app! To do that you’ll need to click the “Export” button at the bottom of the Color Dictionary properties panel.

That button will open a popup window with a generic, unnamed ResourceDictionary stub (seen below).
This window doesn’t make anything final, however, if you want to make some changes to the theme and re-export them to the Export window, it will refresh with your changed colors.
Once you’re ready to use it in your app, click the “Copy to Clipboard” button in the lower right corner and go to UWP Visual Studio solution.
Once in Visual Studio, right-click on the project solution, located in the Solution Explorer.
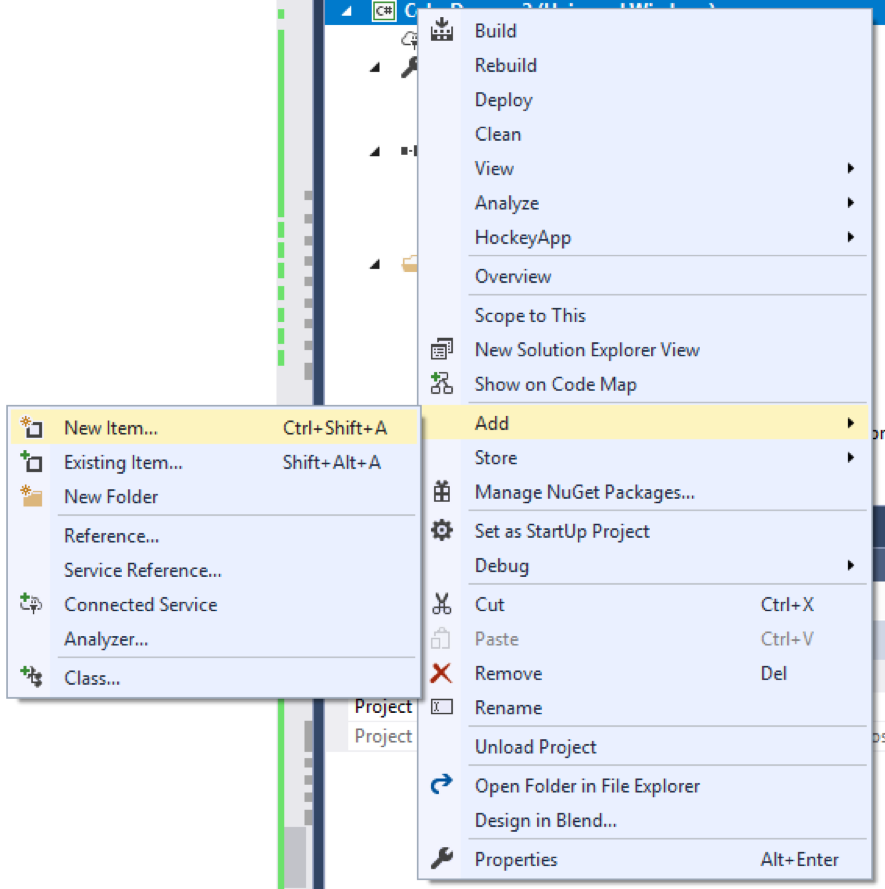
And go to Add > New Item and then choose Resource Dictionary.

Name that dictionary whatever makes sense to you and click Add when you’re done.

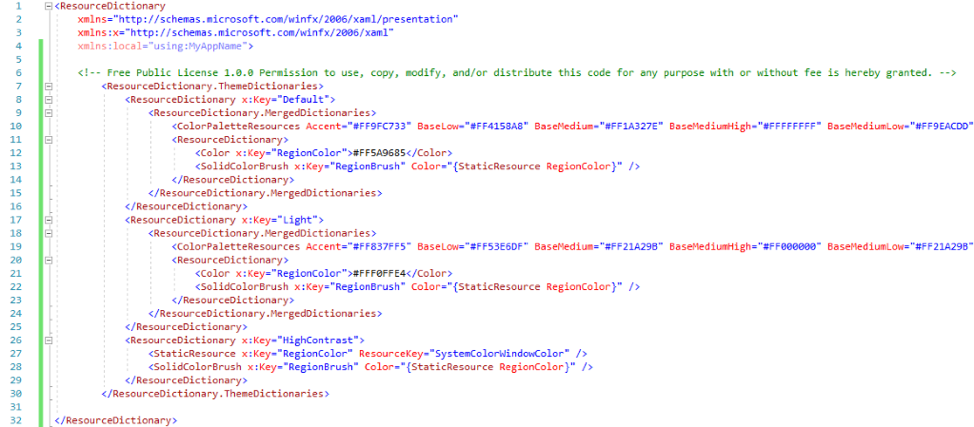
That should generate a blank ResourceDictionary like this:

Now you can paste the exported theme code from the editor into that ResourceDictionary.
Now you have a fully customized color theme waiting to be use, so let’s apply it!
To do that, you’ll want to go into your page or app.xaml (depending on how much of your app you want the theme to apply to) and merge your theme dictionary into the resources of that page or app.
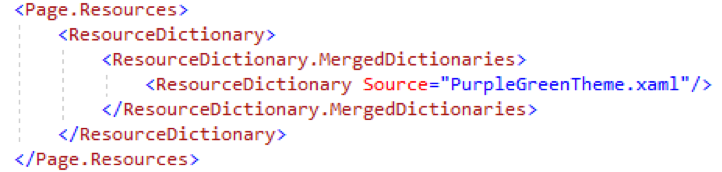
Lastly, don’t forget to set the background color of your page to the RegionColor that you picked for your theme. It’s the only brush that won’t get set automatically.

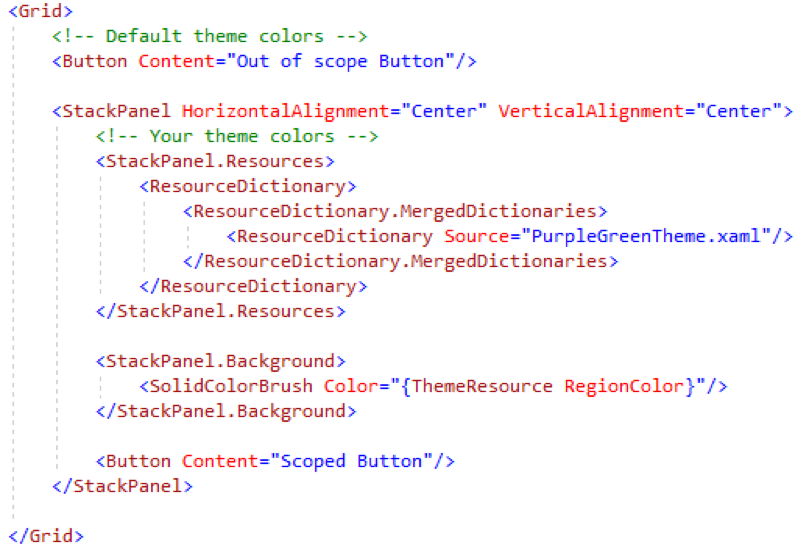
Once that’s in, you’re done! Your theme colors will now be pervasive across your app or page depending. Scoping your theme
If instead you want to scope your theme colors to a smaller area, you can also put all that power into just a container (Like Grid or StackPanel) and the theme will scope to just the controls that live within that container:
 Using your theme down-level
When you export your theme, you’ll see a ResourceDictionary markup with a ColorPaletteResources definition like this:
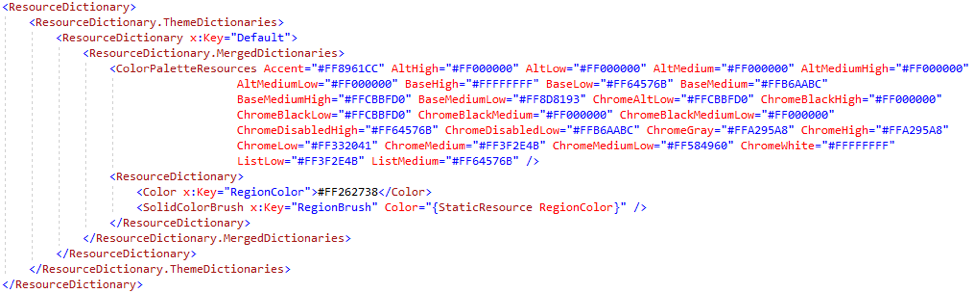
ColorPaletteResources is a friendly API for our SystemColors that sit within generic.xaml and allows for those SystemColors to be scoped at any level.
If you wanted to enable this same theme to work downlevel, you would have to define each SystemColor individually with each color from your theme:
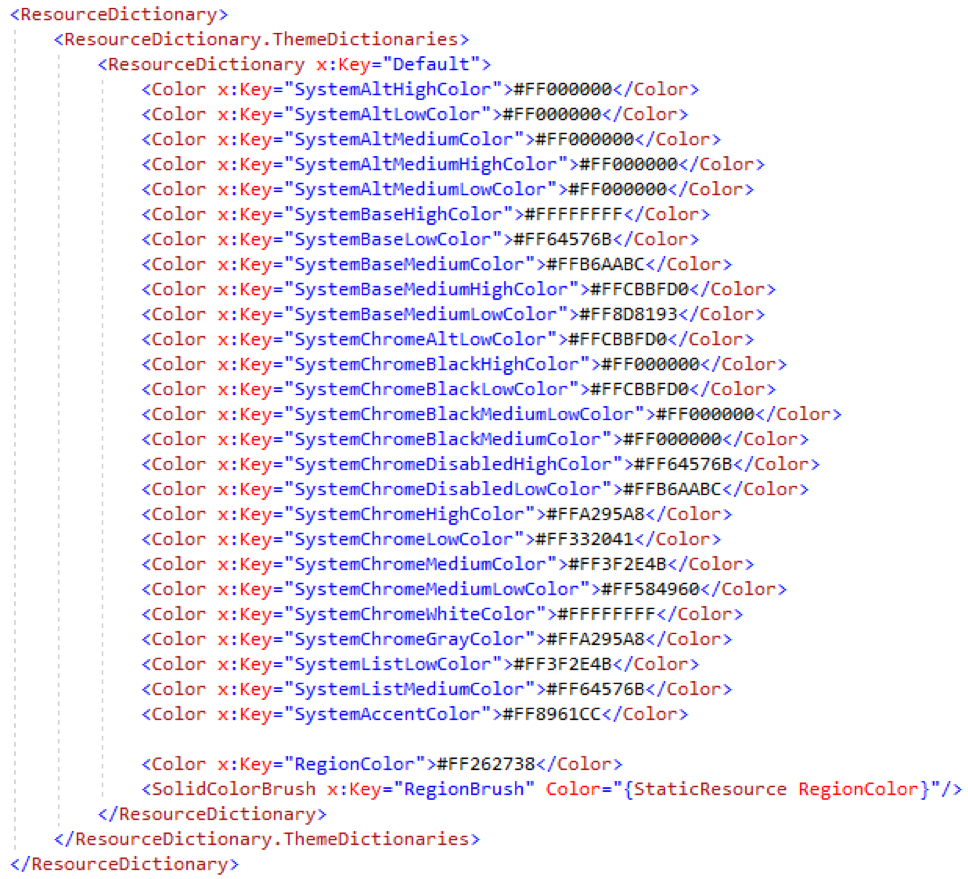
In the above case we’re using the Lavender theme to show this down-level transition.
Warning: Although this markup format change will enable your theme to be applied across controls in earlier SDK versions, it will not work on a page, container or control scoped level. ColorPaletteResources is the API that allows scoping behavior. This markup format will only work at the app.xaml level for earlier SDKs. Get started today
To use the Fluent XAML Theme Editor preview now, head on over to our GitHub repo for the app. There you can download the source to the app and get started with what it has to offer!
Source:windows.blog
Comment
-
What Drives your Windows: Drivers of course
maybe of use:
Source: https://news.softpedia.com/news/one-...0-528980.shtml
Managing drivers in Windows 10 isn’t necessarily an easy thing to do, albeit third-party software that can help with this actually makes the whole process much more convenient.
Technically, installing, uninstalling, or updating drivers is possible on Windows 10 from Device Manager, a screen that hasn’t changed too much from the previous Windows versions and which users are already very familiar with.
But what if you want to see a full list of the drivers installed on your device? Device Manager obviously doesn’t allow you to do this, since its purpose is to let you manage drivers one by one, so how can you do this without installing a third-party application?
It all comes down to a command that you can run in a Command Prompt window and then easily get a full list of drivers on your computer.
So the first step in this comes down to launching Command Prompt – there are multiple ways to do after Microsoft removed the shortcut from the Windows key + X menu, and the one I use regularly is pressing Windows key + R and then typing cmd.exe.
The command that displays all drivers on your Windows 10 device is the following (and scroll down for more parameters that allow you to get even more information):
driverquery
Technically, just by using this command, without the need for any other extra parameter, it’s possible to see all drivers on your device, so give it a try to see how everything is displayed in that Command Prompt window you just launched.
The verbose output, which displays some additional information, including the driver file that is stored on your device, the command is this:
driverquery /v
When it comes to signed drivers, you can easily get plenty of details using a custom command with a dedicated parameter:
driverquery /si
The command also supports a series of other parameters, and to see all of them, just launch the help menu by typing the following command:
driverquery /?
It goes without saying that this list generated in Command Prompt isn’t necessarily easy to read, especially when tons of drivers are installed on the device. Fortunately, there’s an alternative to this method, again without the need for installing a third-party application.
The System Information tool in Windows 10 provides you with a plethora of details regarding your device, including the installed drivers. To launch the app, press Windows key + R and then type:
msinfo
Next, to find the list of drivers, follow this path:
System Information > Software Environment > System Drivers

This time, the UI displays the driver information in a more organized layout, with names, description, drive file, type, start mode, state, and others displayed in a clean interface.
Additionally, you can also search for a specific driver or sort the displayed drivers by type, start mode, state, and others.
Most people use generic drivers that are bundled with Windows, and it goes without saying that these should work correctly, as they are validated by each manufacturer before they make it to update servers. In some cases, however, downloading third-party drivers and software is required, especially when using more advanced gear for gaming or other activities where other hardware is necessary. These are the cases when working with drivers gets a bit more complicated, as downgrades might sometime be required if the latest versions do not work exactly as expected.
In this case, the Device Manager is the tool that helps you deal with everything, although as I said earlier, third-party software also comes in very handy.
Source: https://news.softpedia.com/news/one-...0-528980.shtml
Comment
-
Create a Quick Shutdown Icon for Windows 10 and few other possible handy Ones: How to Create a Shutdown Icon in Windows 10

It’s true that shutting down your Windows 10 PC the old-fashioned way only takes three clicks. But why spend the extra energy when you can do it in two? All you have to do is create a shutdown icon, and you’ll save yourself some time. Create a Shutdown Icon
To create a shutdown icon, right-click your Desktop, hover over “New,” and then select “Shortcut.”

RELATED: How to Shut Down Your Windows 10 PC Using Command Prompt
The “Create Shortcut” menu appears. In the text box under “Type the location of the item,” type the following command and then click “Next”:
Shutdown.exe /s /t 00

In the next window, type a name for your new shortcut if you want. “Shutdown” is the default, so we’ll leave it that for this example.
Click “Finish” to finish the setup process.

Your new shutdown icon will appear on your Desktop.

Now, whenever you double-click the icon, your PC will shut down instantly. Other Useful Shortcuts
As you might have guessed, in addition to Shutdown, there are several other shortcuts you can create. The good news is you don’t have to sacrifice one shortcut to have another—you can create as many as you want.
RELATED: How to Create Desktop Shortcuts on Windows 10 the Easy Way
The steps are the same as those we covered above, except you type different commands for each shortcut.
So, once again, just right-click your Desktop, hover over “New,” and then select “Shortcut.” Then, type any of the commands below to create the other shortcuts you want.Command Shortcut Icon Type Shutdown.exe /r /t 00 Restart rundll32.exe powrprof.dll,SetSuspendState 0,1,0 Sleep rundll32.exe PowrProf.dll,SetSuspendState Hibernate Rundll32.exe User32.dll,LockWorkStation Lock PC
Source:
Comment

There are currently 2775 users online. 1 members and 2774 guests.
Most users ever online was 63,956 at 18:56 on 20 March 2025.
Comment